VFX Toolbox
Research for Island
In my first assignment I m creating an Island on the programme named Unity. This programme is mainly used to created games. However, we are currently using it to create a first person showcase for our models that will be made into a scene on an island.
First of all I had to create an island this was very fun and I enjoyed it very much. This was because we got to experiment with the tools within the programme. First of all I had to get some reference images. I didn't need many until I understood what I wanted to create.


I wanted to create an island that had a maintain going around the edge of it with a little bit of work room in the middle, Mainly for aesthetic purposes and to allow a compact working area. I created my vision within unity.

I started of by creating basic shape for a maintain, this is what I ended up with .

I than added in more maintain range around the sides to cover up most of the island. Than leaving a small area to work.


I began to have a look at airports that are built in small compact spaces. To get an idea on how they would look. This is because I want to build a WW2 airport on a small island

With the cubes provided by Unity I marked out what my island is going to look like. I have the runway strip which is the really long cuboid running across most of the island. The small cubes on the right are hangers that will have spitfires in them.
Hanger

This is the WW2 hanger that I have based mine off

This the hanger that I have created. Because the model is a basic shape I will be adding a lot of the detail on when I put this model through substance painter, Which I am hoping I can increase my skill on.

I used substance painter to texture my model which turned out okay however I do need to inprove with substance painter alot.
Spitfire


I am currently modelling a spitfire which is of coarse nowhere near finished. This is gonna be one of my main models in my scene so will take a while to create.
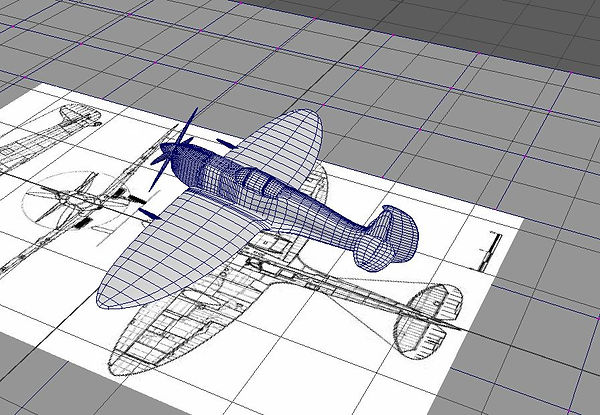
This is the final image for my spitfire before I took it into substance painter

This is how he model ended up in substance painter. I like how it looks as I tried my best to produce the accurate camouflage.
Photogrammetry
Photogrammetry is the science of making measurements from photographs. The input to photogrammetry is photographs, and the output is typically a map, a drawing, a measurement, or a 3D model of some real-world object or scene.

Step 1
Firstly, the most important part is to get images to use. Every angle of the image should be photographed. Once you are satisfied with the images you have taken. Go to Workflow > Align photos. This will place all the photos in there correct position. Showing up on the program as a blue square.
Step 2
Once all the photos have been aligned. You then have to go the Workflow > Build Dense Cloud. What this does is create a small image with little dots. However it is not the complete image.
Step 3
Step 3 is where we start to get the full image. We got to workflow > Build Mesh. This create the full image of our model.
Step 4
We then need to Bake the texture, we do tis by going to Workflow > Build texture mesh. Once this has been done we then need to export the object we do this by going to File > Export Model.
Step 6


Step 5
The next sep is to open Maya and then import the model in. We then need to apply the texture to the model. In doing so we also need to clean up the edges of the table until we just have a box.


The Model then need to be created to a live model. This can be done by selecting the magnet in the top corner.

Step 7
We then need to go to the Quad Draw this allows you to draw a blue box around the object. To do this we must place vertexes in the correct places to support the structure of a quadrilateral.

Step 8
Once a new box has been made with the Quad draw we need to align the box, this can be done by going to the wire frame. and the side view and line up the vertexes. Once the box is lined up we need to bake the boxes. we do this by changing the menu to rendering and the go to Light/Shading then Transfer maps. A menu will pop up the new model will need to be selected for the target mesh and the old model will need to be selected for the source mesh. The map width and height needs to be changed to 2048. Then click on bake.

Photogrammetry boot

I took pictures of my sisters boot which looked like this I lined up all the images and created all the mesh clouds I than made the dense cloud which in turn made a model which I exported into Maya.

I created a lower poly version of my boot which from this image it looks extremally basic. However, when you add the texture it look great.

This is how both the models look with the texture on them. They look similar even though the boot on the left does look better however, the detail keeps with the second
Here is my image on sketchfab.
Radio Tower

I created a Radio tower which is used to control the flights from the airport. I thought this would be appropriate as I have an airport in on my island.

I took the tower into substance painter and applied all the textures to the model.
This is my Radio tower which is not my best model so i am still deciding whether or not t have it in my scene.
WW2 Tent

I created a tent that had beds inside which is used as a hospital bed that would have been in WW2. I took the model into substance painter and painted onto it.

There was one issue that I had with my tent when I applied all the textures in my scene the legs to the bed where the same material as the fabric of the main bed. Where as they where meant to be metal
This is my tent model which is probebly one of my best models.
Crates

I created crates for my scene mainly to fill it in a bit more. I also individually textured them to give hem a different colour. These where all made pretty easily within substance painter
The scene
Final images
James Bond Title sequence
Models
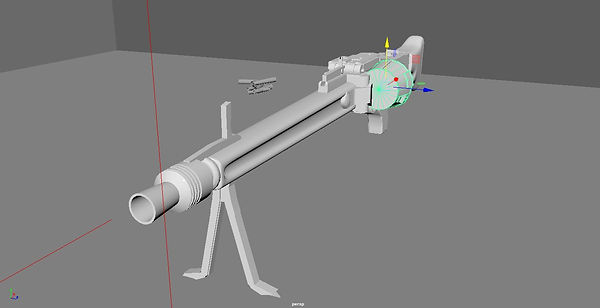
This model is my MG42 which i made for a previous project. However i improved it and improved the textures.


This is my textures within Substance painter which i improved by baking the textures which allowed the special material to layout itself in the best areas of the model. Giving a nice warn look.

This is what my model looks like with the textures on within maya.

This is the bullet shell model i made, i made this because i want to make a scene where the bullet shells fly out the gun as if it ws shooting.

This is my texture within substance painter

This is what my bullet shells look like in maya with the texture one

I added Keyframes to my objects to make them move.
Green screen
A major part of my work is taking green screen footage and adding it into the project. this can be accomplished within after effects and it is really simple.

I opened the video in after effects.

To get rid of the green background it is very simple and the only effect you need is Keylight. To open Keylight you go to the Effect tab then Keying then pick Keylight.

I than selected the screen colour option and using the inc pen symbol i selected the green background which then completely gets rid of all the green colours in the background. However there is till areas the Keylight has not complety got rid of.

To get rid of the remaining background i fiddled with the settings of screen grain which gets rid of all the remaining background.

I have used this within my project alot. Here i have created a silhouette.

I created a solid white object and put in under the video in the hierarchy window and turned the solid white into an alpha. Making it into an alpha meant that the object in front of it read the information from the solid. creating a solid white figure of a person.
Masking
The yellow box is a mask. This allows me to get rid of an area of the scene.
Using models in After Effects

Rendering my sequence out of Maya i was able to place them into my project. I did this with all my models which are the MG42, Bullets and grave stones


Particle effect

Using a silhouette i added particles to make it look like the charactor is turning to dust.

Using the particles i created a dust affect. Which was actually very complicated to make.

I had to key out a person in shot because there was two people in the shot and i only wanted one of them.

Due to the fact the person who i did not want in the shot moved so much i had to use key frame to adjust where the Mask was. I did this by clicking on the little stop watch next to the option that i wanted in my case it was the mask path and the great thing about key frames is once you adjust the position f the object a key frame is automatically set.

Adding particles effects within maya consists of a lot of messing around with the settings and see what comes out of it.
Background
The background within my introduction was made out of a solid grey colour and two pieces of stock footage. Which is dark smoke and amber effect.

I feel like the background is very important as it helps set the mood and i wanted to create a dark mood within my Sequence which is why i used dark colours.
I used pieces of stock footage in the background as i beleived it was the best way i could create an interesting scene that has good visuals throughout the scene, without creating a background that is to distracting to take way the attention from the main object within the scene.
MG42 shot
The MG42 shot was one of the main areas of my sequence as. which i had to add alot of effects to it including masking. Like i said earlier most of the work was done within Maya.

I added a mask to this shot as when i created the scene within maya the Bullets spawn in the area where the mask is. So without the mask you see floating bullets waiting to start there turn.
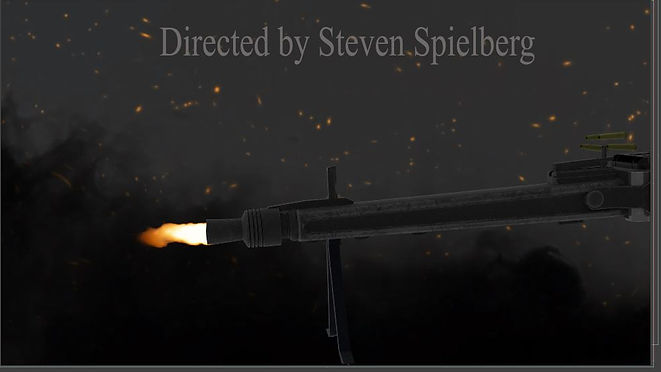
I added a slow motion nuzzle flash. I had to grab some stock footage to use.
I used the clip as a nuzzle flash.

Using keyframes i created a transition to move towards a silhouette that has a blood splatter come out of it. As if the gun is shooting him.

I added a the blood splatter to the scene and added a solid white colour behind it and turned it into an alpha to create a silhouette.
Grave Shot

I created this scene as i wanted to represent death in my scene. so the grave would be a great idea for that. Most of the shot was created in Maya.

Here is my work within maya. I used keyframes to create an animation. Pretty much the whole scene was made in maya

I created a transition scene to the shot by going through the hole in the grave i thought this was a nice and neat idea.
Bullet falling shot.

This scene is very simple and as i had made the bullets already i wanted them to have there own scene.
Flame Skull

The Flame Skull is something i made in class using Particle effects and stock footage. It was just a tutorial with particles and i liked it so thought i would place it in my final sequence

I zoomed into the eye of the skull to use it as a transition.

This next shot i created it as it is what the person had seen and the spies he has killed through the zoom of a sniper.
End and title of the sequence

Using a silhouette and an image and a piece of stock footage i created this at the end.
My Song
The song i chose was Ashes by Celine Dion. I chose this song because I did not want to pick a bond song however, the next best thing would be this song as it was made for a bond type sequence that was in dead pool 2.
Final Product
What Inspired me

The Visuals from Live and Let Die is what inspired me for my dark and fire feel that i have throughout my sequence.
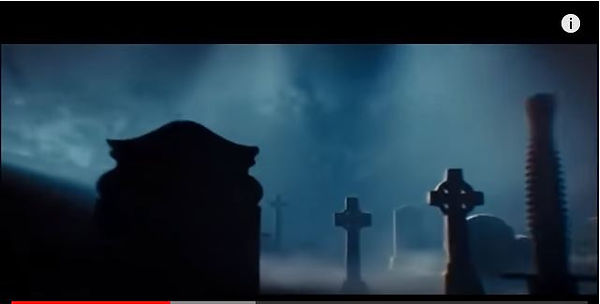
The Grave yard scene in SkyFall Opening scene heavily inspired the scenes with graveyards and coffins within my sequence