Dominos
I will be using Maya and the bullet system to create a simulation of dominos falling.

I began by creating a Domino shape. I original created a cube and added these dimensions to it. Height: 7.5 and Width: 3.5. I then moved the Y axis of the domino by 3.75 to move the object in line with the floor.

To easily create multiple pieces of dominos I clicked on Edit > Duplicate Special. I opened the settings menu and impute these pieces of information. Within the Translate box I put -2.000 within the X axis. Then i increased the number of copies to 40. Next i clicked on Duplicate special to create 40 copies.
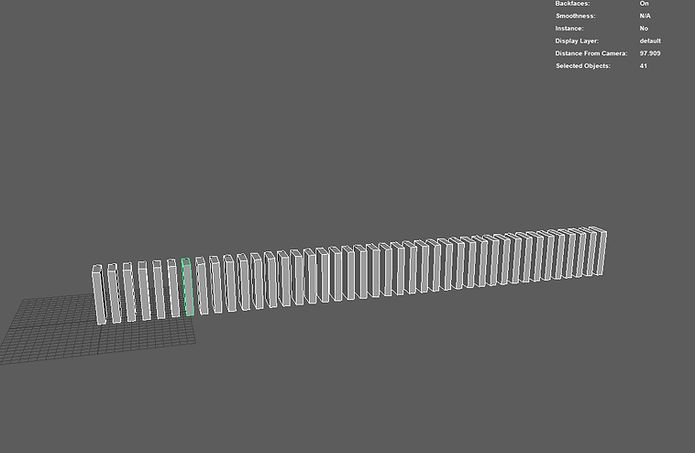
Here is all my copied pieces of dominos.

Selecting all the dominos I clicked on the bullet tab and opened the options of the Active Rigigd Body. I added the collider as a box. I changed the body type to Dynamic Right Body. After this I changed the Collider shape Margin to 0.0100. I then clicked Apply and close.
I created a plane, this will act as a floor for the dominos to fall onto. I opened the Active Rigid Body tool again but changed the Body type to Static body I also changed the Collider shape type to Mesh.


I selected the first domino in the line and in the Bullet rigid shape settings the changed the Impulse option in the X axis to -0.2. This pushes the domino over and knocks the rest over. However the only issue is that these dominos fall to slowly. This is due to the fact that Maya believes they are a lot bigger then what we want them to be. Therefore they have physics applied to them of a large and heavy object.
Here is the video showing the dominos falling. AS you can see it is falling extremely slow.

To fix the slow moving dominos, i simply clicked on the Bulletsolver within the Outliner to open up the settings within the attribute editor. I then changed the Gravity in the middle box to -980.00 This means the dominos will begin to act like a smaller object and fall faster. I also changed the Internal fixed frame rate to 240hrtz. I then increased the impulse to -5 to increase the power put into the first domino.
Here is the final video of the dominos falling over. I enjoyed using the bullet system within maya. As I feel there is a lot of exciting thing that I can create with this. In the final play blast the dominos fall faster due to us increasing the gravity within the settings.
Jenga Tower

I created three small Jenga bricks by creating a cube and enlarging it. Length i increased to 9 and width I increased to 3. I then duplicated another 2 blocks and used the Translate tab to move it either side of the original block. I group the three blocks together.

Next I needed to duplicate multiple Jenga pieces on top of each other. To do this I opened the Duplicate special options and added the pieces of information seen in the picture.
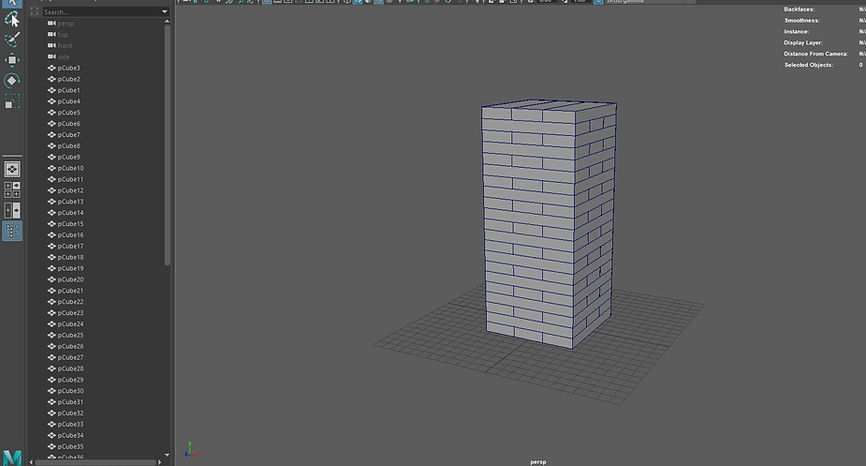
Once I finished the duplicate special, it created a Jenga tower. I also ungrouped all the Jenga blocks.
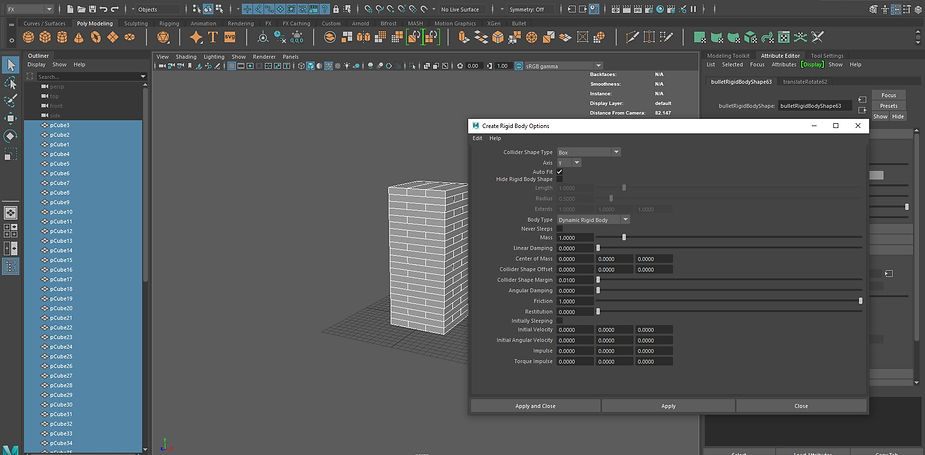
I then added the Bullet Rigid body. I did this by selected the FX editing options from the drop down box in the top left corner. I clicked on Bullet > Rigid Body. I selected the options shown in the image above.

I then created a Sphere and added A kinetic rigid body within the Rigid body options.

Next I added key frames to the ball so it can hit the Jenga tower. However when the ball hits the tower it stops and floats in position. To stop this I changed the body type within the Channel box to Dynamic rigid body using a key frame. This means the sphere will now act with gravity and will fall.
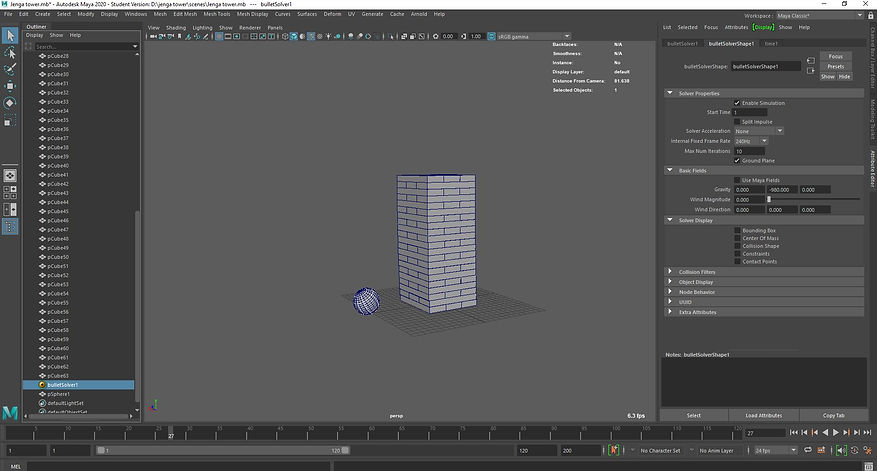
However, due to maya believing the Jenga tower blocks are 9 metres long and 3 metres wide they act and fall like very heavy objects. To fix this I decreased the gravity to -980.0. This means the Jenga pieces fall a lot faster.
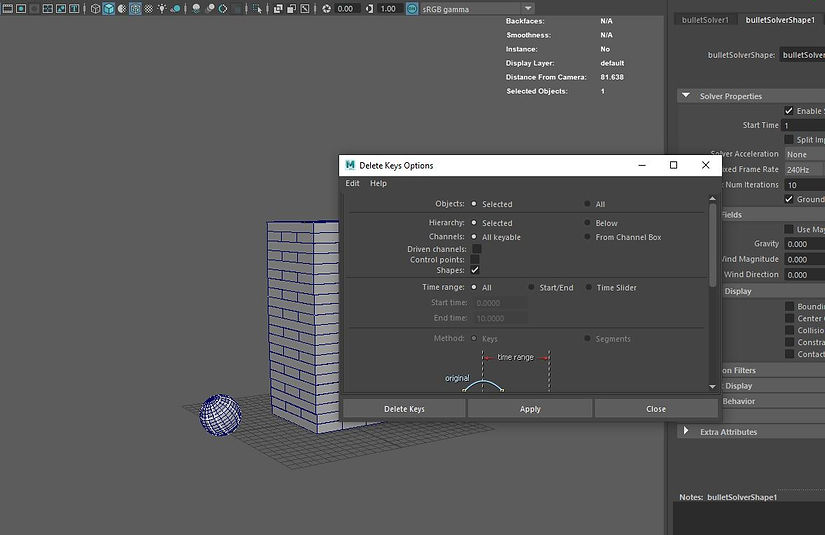
Issue is the gravity changes how the ball works and the ball now does now fall a lot faster then it did before. To fix this I deleted the the keys on the sphere, to do this I went to edit > Keys > delete. I re-added the Kinetic body type also I key framed it again.
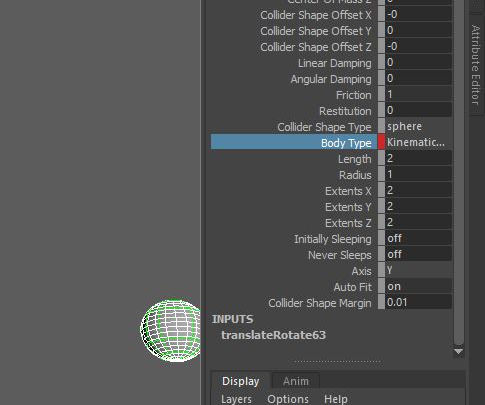
I then changed the Body type from Kinematic to Dynamic using keyframes, I keyframed it just as the sphere hit the Jenga tower which allows the sphere to act wit the forces of gravity after it hits the bricks.
Here is the final play blast of the Jenga tower. I enjoyed this task as it shows the power and ability the maya has as it is able to accurately simulate gravity.
NCloth

To create the Ncloth I began by creating a plane. I then increased the width of this plan to 14.0 and increased the length to 10.0. Subdivisions width i increased to 24 and the length I increased to 20. I then clicked tool bar to FX and after this I clicked on Ncloth > Create nCloth.
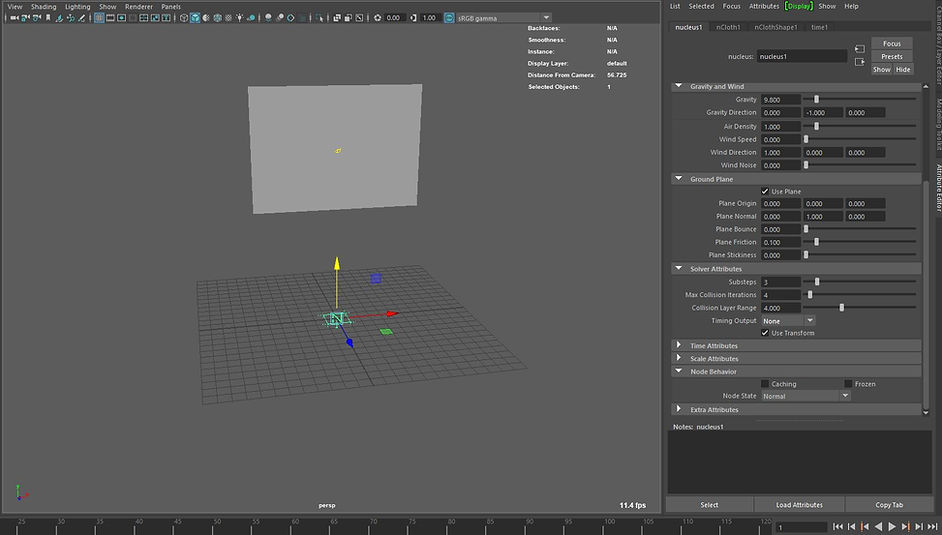
Next I rotated the plane and lifted it of the ground. After this I clicked the N axis point. I then ticked Use plane, this allowed the floor to act as resistant block for the nCloth to fall on.
I then pressed play and this is what happened:
The Plane falls to the flaw and folds up like a cloth. Within Maya there is also presets that can be selected.
Concrete
Silk
Flag
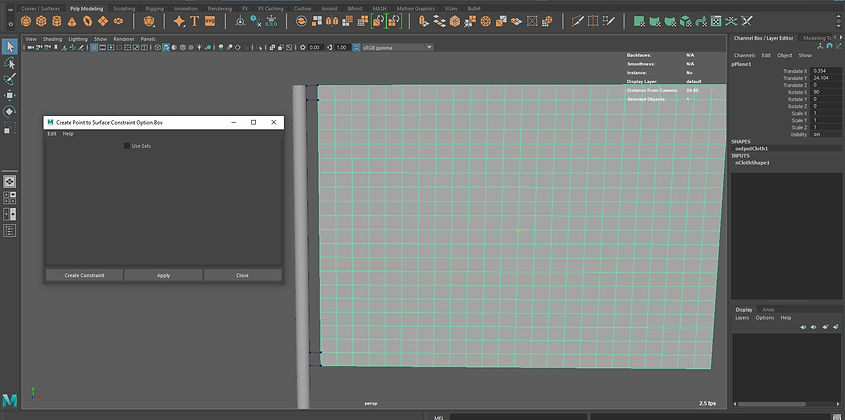
Next I Added in a cylinder to act as a flag pole. I placed it near to the Ncloth. Next I selected the two top Vectors on the end of the Ncloth, I also selected the flag pole after. I then went to nConstraint > Point to surface. I also did this for the bottom two vectors aswell. Doing this connects those two vectors to the pole but the rest or the n cloth is free to move.

Within the Nucleus settings I increased the wind speed. This means when I press play the n cloth with move like flag due to the force of the wind.
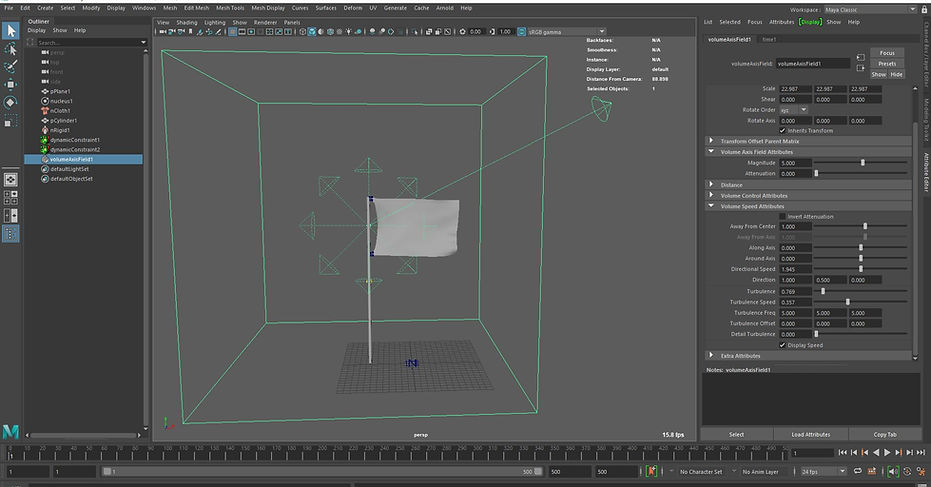
Even though I have already added wind to interact with the flag. It does not look realistic. To have more control over the wind I added a Volume and field. This allows me to have more control over the wind.

Within the Volume speeds settings i applied the following settings:
I had to play around with the settings for a bit to get a good result. The settings i adjusted was the Directional speed, Direction, Turbulence and Turbulence Freq.
Final video
Here is the final result of my flag. I had to do one last step, I played the video and stopped it once the wind had kicked in. Next I selected the flag and clicked Filed/Solvers > Initial state > set for selected.
Skirt

I began by creating the skirt for my character to wear. I did this by creating a Cylinder, I added 40 to the sub divisions axis I also added 30 to subdivision height. I then went to Deform > Lattice. This gives me easy control over adjusting the cylinder at either end. Using the edges of the lattice I created the shape of a dress.
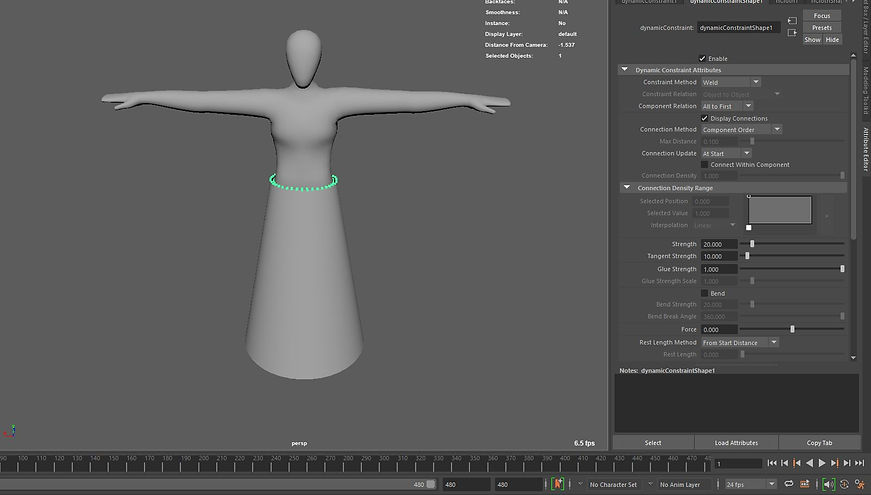
After I had created the skirt, I deleted history. This got rid of the Lattice but kept the shape of the skirt. I then created a N cloth on the skirt. As I did with the flag I added connected the vector pontes to a object. However, this time I connected the top of the skirt to the waist of the body. I Changed the constraint method to weld. When i press play the top of the skirt will connect to the waist.


When i press play after connecting both the edge of the skirt and the body the area that was connected rises up and does not look right. To fix this I clicked on The nrigidShape and nClothShape ticked Collide and changed the Thickness to 0.001

However, as soon as I play the scene the skirt begins to raise above the waist and dos not look natural. There is a way to fix it though.

The way to fix it is to change the Space scale to 0.1. This means the skirt gets pushed down and does not wrinkle.
This is the final video showing the skirt. There are no creases at the top and the skirt flows nicely.
Ncloth Tear

I create a plane object I made the width 24.0 and made the height 24.0 as well. Next, I increased the subdivision width and height to 40. Next I created a Ncloth. I did this by selecting the plane and then going to nCloth > Create nCloth.

Creating a Torus is the next step. I adjusted the settings within the history tab. I adjusted the radios to 19.0, twist i set to 45.0 Subdivision axis I set 4 and finally height I changed to 4.
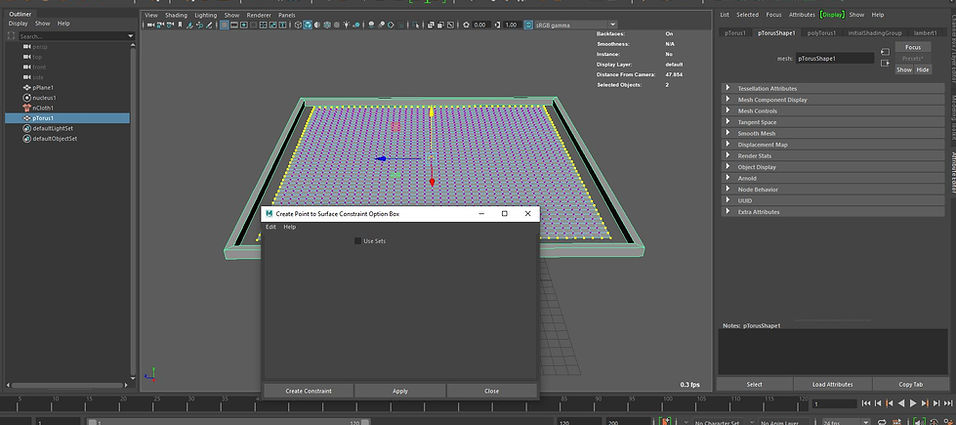
Next I selected the vertices of the edge of the plane and clicked to the torus. After this, I clicked on nConstraint > Create point.

The next step was to create an emitter. I did this by going to nParticles > Create Emitter. I increased the radious of the objects being emitted from the emitter to 0.5,

My next step was to make the nCloth really stretchy so it will be able to tear. I used the Silk preset. Normally honey would be he preset but my laptop kept on crashing when I tired to use it. Therefore I used the silk one. I adjusted the Stretch resistance to make the nCloth stretch.
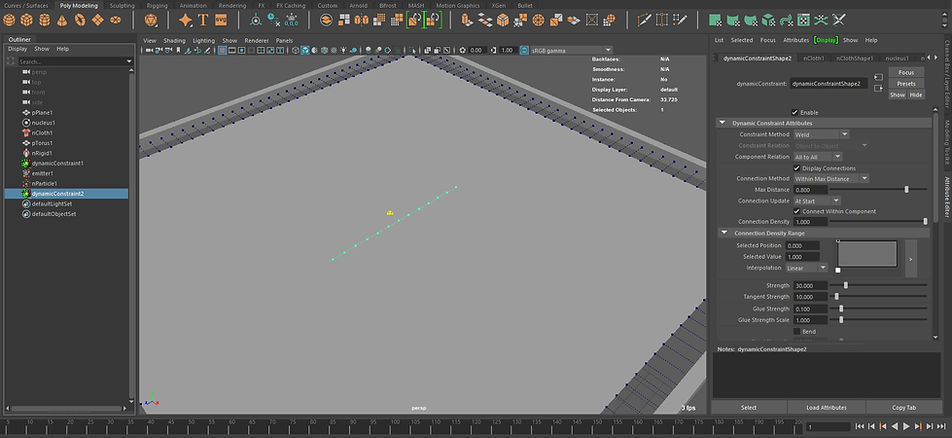
Next I clicked on vertices in the middle of the cloth and went to nConstraint> Tearable service. After this I edited the distance settings within the constraint attribute and set them to 0.8.
Trail

I began by animated the sphere in a circle and as it spins I animated it to rise up. I Placed the Sphere. into a group. This moved the pivot point into the centre and made it easier to animate the sphere rotating and rising up.

Next step I selected the the sphere within the Group. Next I go to Nparticles > Create Options and I make sure it is selected to Point. Next within Nparticles still I went to Emit from Object and clicked Create. Now when i hit play there will be particles coming from the object.

I clicked on the Emitter which is found under the sphere. In the attribute editor I went to the basic settings in the Emitter an changed the Emite type to surface. In the image it say 1000 for the rate emitted however early on i change it to 100 otherwise it slows down my PC to much.

After i selected the NparticleShape within the attribute Editor and under Dynamic properties I ticked the box Ignore Solver gravity due to the particles falling down straight away. This way the particles float around the scene. I also set the Damp to 1, this will come into place in the future.

With the particles selected I Went to Field/Solvers > Volume Axis and clicked create. I enlarged the Volume to cover the whole scene and the particles need to be within the Volume to be effected.
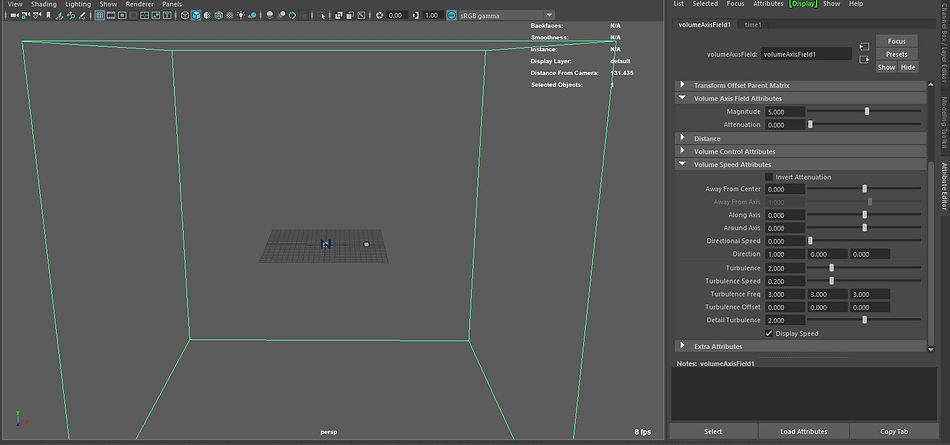
Within the settings I changed all these settings so the wind effects the particles in a way that I want. I set the turbulence to 2. Also all the other settings are set to what you see in the image. Usually the particles will blow around loads but due to use changing the damp to 1 earlier on it falls in an organised line.
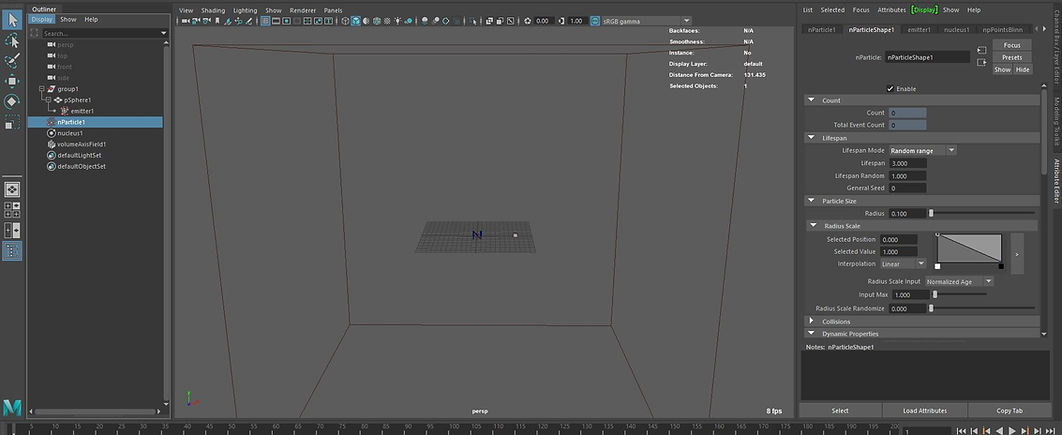
After this I clicked on Nparticles within the Outliner. Then within the Nparticleshape I changed the Lifespan mode to Random range, Life span to 3.000 and life span random to 1.00. This means that all the particles will not disappear at the same time making it look realistic. I kept radios at 0.1. Then on the graph within the Radios scale I moved the graph so the line is Diagonal. Then within the Shading tab I changed the Particle render type to Spheres instead of points. Next In the emitter tab within the attributes editor I changed the ratio particles to 1000.0 to add more particles emitting from the sphere.

Next within the Nparticleshape tab I edited the colour settings. I began with the selected colour as yellow. Within the colour input is selected Normalize age Within the colour graph I added another colour and used purple.
All of the size and amount of particles created can also be changed. The settings I have picked do not have to be the final piece
Final
Arnold

I began by creating a basic scene. With four simple shapes a cube, cylinder and a cone. I applied present materials to them. I also added a rectangle and added a green colour to it. I also added a Arnold AI shader to all the materials.

Within the Render settings I also added AOV's to my render, the ones i added are seen above.

My next step was to create a custom AOV. I did this by clicking on the Add custom option under the active AOV table. I called my AO CUSTOM_AO. To edit the the AO I clicked on the little tringle on the right side of the options. This brought up settings in the attribute editor. I clicked on the shader option and added a Arnold shader called Ambient conclusion. I edited the far clip option and moved it up to 2.
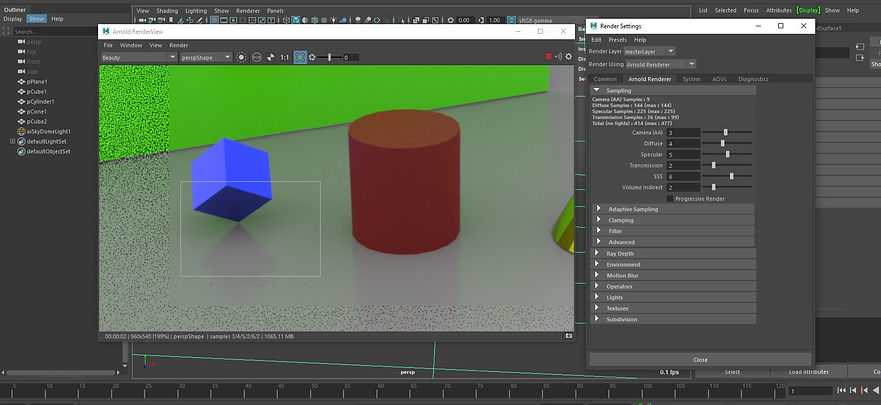
Next I needed to edit the render settings to get rid of the noise within the render. I did this by using the AOV's I added earlier to see the different views and then edit the areas i need to. The sampling is the area that I needed to change to adjust the look of the render. The settings are as seen on the right of the image.

I began by opening up the render setup. This allows me to select different areas of the render in layers. I began by clicking on the button on the left just above the first layer. This allows me to begin adding layers. I created a collection buy right clicking on the top layer and selecting the create collection option. Next within the collection options I can select the collection filters. In this case I have made one for the mesh.

In my next collection I have added a transform option. I did this by creating a Collection for one shape. In this case the Torus. I created a group collection and in the include title I put *pT* This means it only includes the torus group. I then applied the transform option. Selecting the torus option I right clicked on the transform option ad clicked on Create Absolute Override for visable layer.
Camera Rig

To create a camera rig is very simple. I simply created a camera and then created 6 locators. These locators I called Master Cam CNTRL, Rotate, Pitch, Track, Pan and tilt. I then parented the camera and locators. From the camera and Tilt onwards.
Using the Camera rig i was easily able to create this animation.
Lights
ai Sky
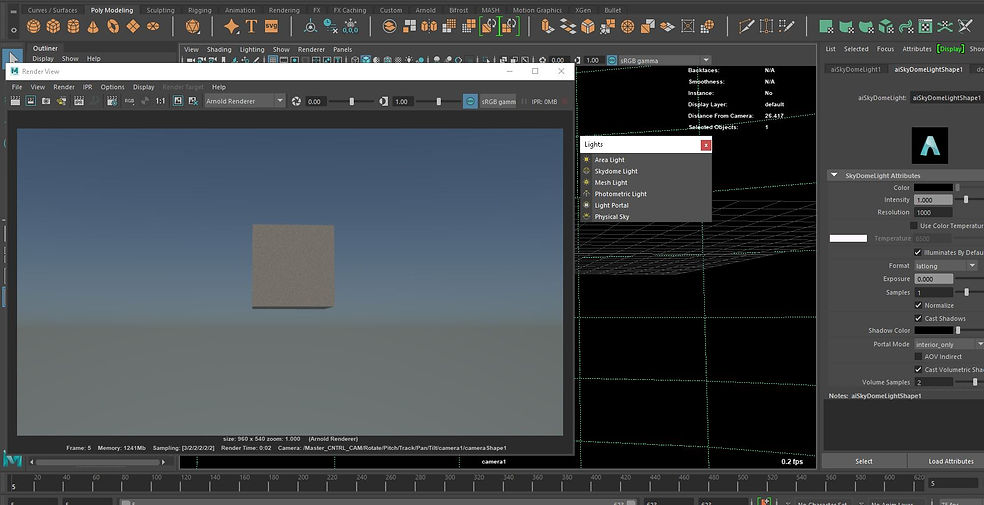
Now I will focus on lights. There are six Arnold lights. The area light is the best one as it is easy to render. the sky dome covers the whole scene and allows the user to place HDRI's in it. This creates real light. The mesh light creates a mesh into a light. The next two I don't use however they do have there uses. The light I will be using is the Physical sky. This creates a real life simulated sky.

Next I can adjust the settings of the sky. I open these options up by click on the option button next to the colour. The first option is the Turbidity, this increases the haziness of the image. The Ground Albedo increases the reflections in the sky from the floor. The Azimuth changes the time of day, therefore I can change if it is morning or evening. The intensity allows me to change the angle of the sun. The sky tint allows me to change the colour of the sky and the sun tint changes the colour of the light from the sun.
Sky dome
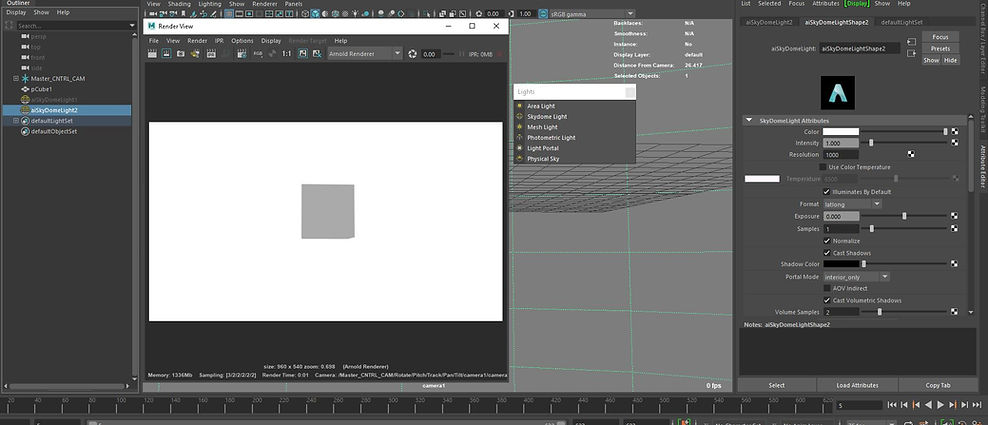
The next main light is the sky dome. This creates a continuous light around the object from all sides. I can also place a HDRI into the colour option. This creates a background with realistic light. This useful for creating realistic lights.
Fire
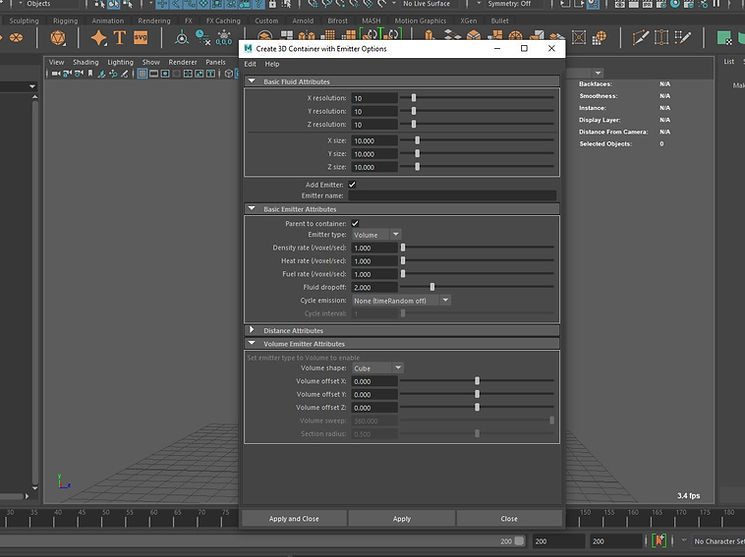
I began by creating a 3D container with an emitter. I did this by clicking on Nfluids > 3D container. I ticked the box that says add emitter.
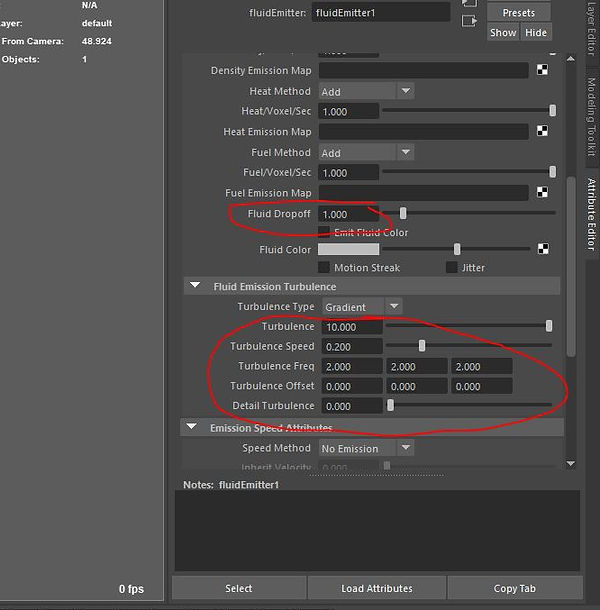
Within the attribute editor I changed the fluid drop-off to 1. Next i adjusted the turbulence settings.

I also adjusted the resolution and changed it to 75 to allow the particle effects to look and flow better. I also adjusted the size of the container. Below these settings is the contents method tab. I changed the Fuel option to Dynamic Gold.
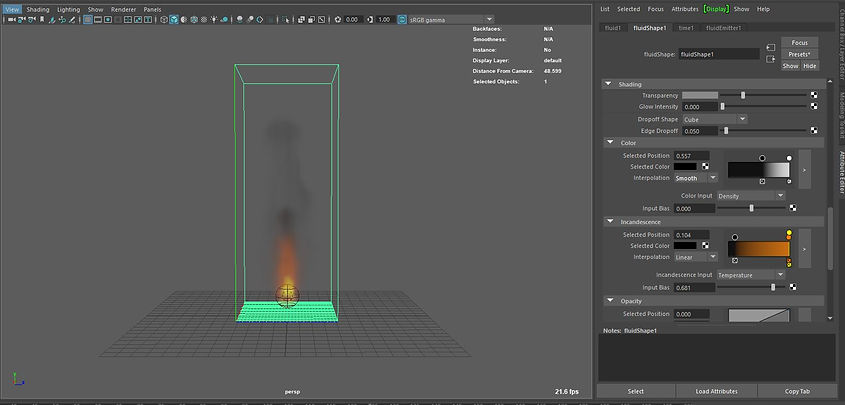
Adding colour was my next step. I did this within the shading options in the options of the fluid shape. In the colour options I changed the interpolation to smooth. Next i added in a white colour and switched them around with the black. In the incandescence options all I did was play around with the black, orange and yellow options to get the outcome i wanted.


My next step is two edit the settings of multiple options. These options will determine how the flame looks, how powerful the light levels are and etc. These settings are the Density, Temperature and fuel. I adjusted the density scale What this does is essentially changed the opacity of the fluid. I changed this to 2. I set the buoyancy to 0.2. This changes how fast the fluid will rise from the emitter. I set the dissipation to 0.1 this changes how fast the fluid will changes colour over time. Next I edited the temperature options. This all effects the colour of the fluid. I set the temperature scale to 3. The buoyancy to 8, dissipation to 5, diffusion 0.219 and Turbulence to 0.1. I edited the fuel options as well i changed the fuel scale to 1, the Air/Fuel ratio to 20, Heat released 4.932 and the light released to 5.

To make the fire act realistically I edited the swirl effects Thus means the flames break of into little bits as they rise. Also the flame moves around ad the smoke swirls as it rises. To do this I changed all the swirl scales to 2, the swirl option I changed to 10 and final i changed the noise to 0.1.
Fluids with particles


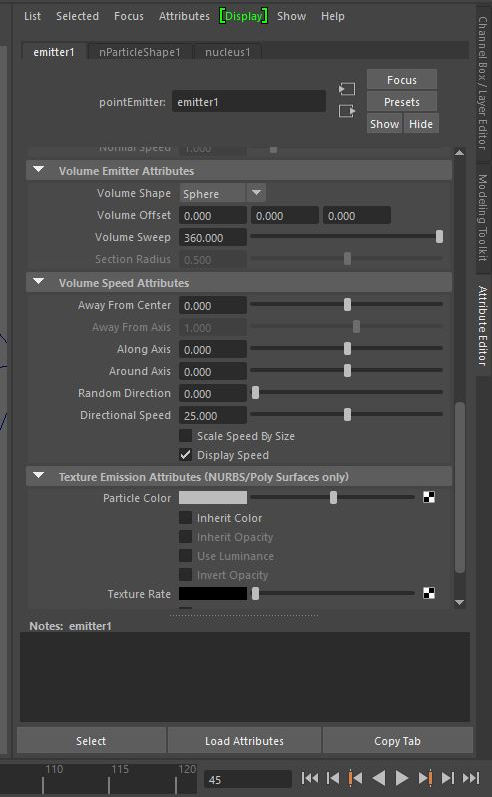
These are the first settings I put onto the emitter I created the emitter by going to nParticles > create emitter. Next I edited the settings of the Emitter. I changed the emitter type to Volume, the volume shape to Sphere. I changed the direction X to 1. This is so the particles only move in one direction. I also changed Away from centre to 0. Next i needed to edit the direction speed which I changed to 25. After this I clicked on the nParticle shape tab I clicked on dynamic properties and ticked the box saying Ignore solver gravity.

After the previous steps I edited the lifespan and the dynamic properties. In the life span options I changed the lifespan mode to Random range, Lifespan to 0.25 and lifespan random to 1. In the dynamic properties I edited the drag as well and set it to 0.033. Then once I am happy with these options I can add in the 3D container. I did this by going to nParticles > 3D container.

Once the 3D container is added. These are the settings I changed. I changed the size to 45, 8 and 8. I also set the base resolution to 75. The next step is to allow the particles to emit fluids. I did this by clicking on the particles and the container. I then clicked on Fluids > Add/ edit contents > Emit from object. My next step is to change the temperature to Dynamic Gold. The fluid will rise out of the particles. Therefore to make them not do this I turned the buoyancy down to 0 on both the density and temperature.

Next I added the colour to the fluid. The way I did this is the same way as the previous fluid.

Next step was to adjust the Heat/Voxel/Sec to 2. Next I adjusted the turbulence settings to allow the flames to move realistically. I adjusted the settings of turbulence to 10, turbulence freq to 2, 2 and 2 and finally turbulence speed to 0.2
Bifrost Part 1

I began by creating a base scene. I created a cube and reshaped it to become a base for the whole scene. I also used a cylinder to create a cup style object. Finally, I created a sphere which will be used as the emitter. To turn the sphere into a liquid source, I clicked on the sphere and went to Biforst Fluids > Liquid. Next I needed to turn the Objects that the liquid falls into a collider so the liquid reacts to the object. I did this by clicking Bifrost Fluids > Collider. Whilst the object i want to make a collider selected.
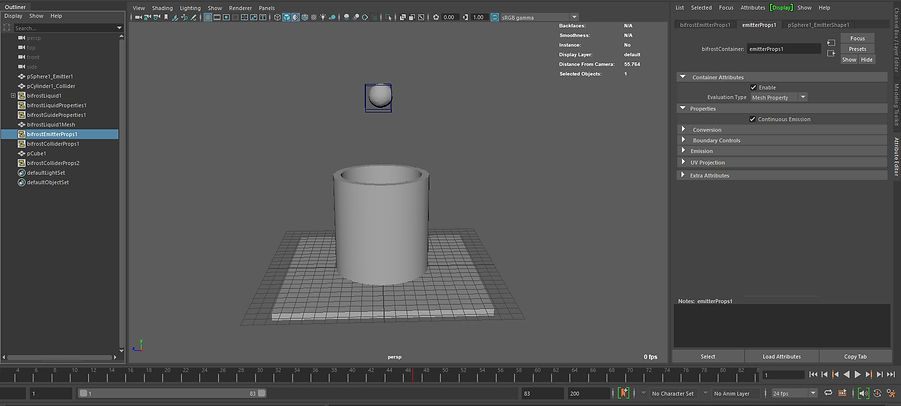
However, at first the fluid particles at standard come out as a circle ( the shape of the emitter). This is not what I wanted overall. To change this I clicked on the bifrost Emitter in the outliner. Then within the Attribute editor I ticked the box that says Continuous Emission.
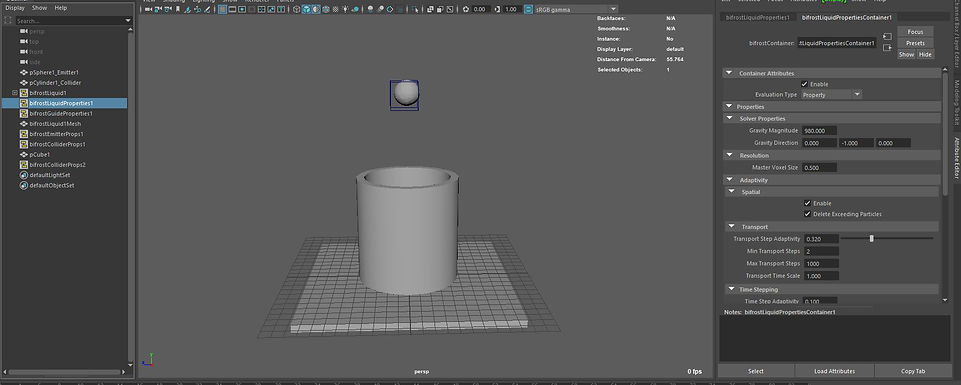

The next step is to adjust the scale. This is because this current scene is calculated by Maya o be a lot bigger then it actually is. This is because each square on the grid is equivalent to one metre. To change this i adjust the Gravity Magnitude from 9.8 to 980. Then the Density to 0.001 from 1.
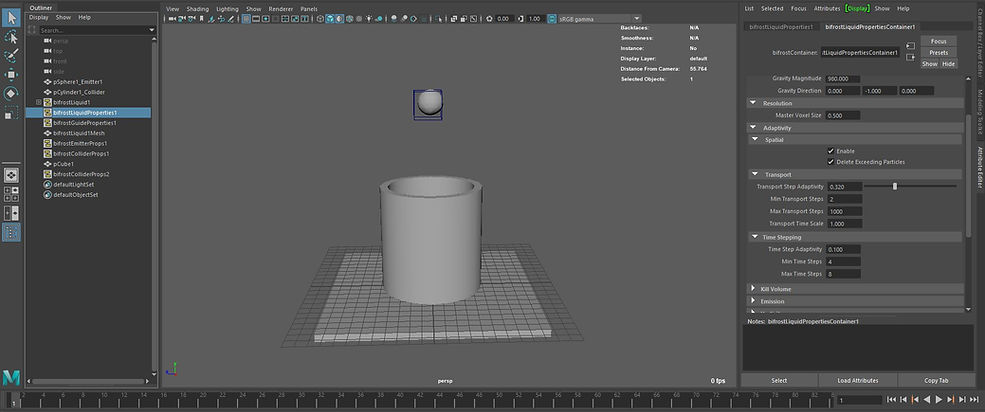
However, the particles fly through the cup and the base floor due to the speed of them. To fix this I clicked on Liquid properties and changed these settings. Min transport steps to 2. Min time steps to 4. Min time steps 8. This will then fix that issue.
Next I cached the scene. What this does is mean that Maya does not need to load the animation and I can slide the timeline up and down and the animation will move freely making it easier to look at the animation. To do this I clicked on Bifrost Fluids > Compute and Cache to disk. This means the Cache will always be there.

Next Within the BifrostLiquid option in the Outliner I will find the Liquid option. In the attribute Editor under the Liquidshape1 option I can find a drop down called Bifrost Meshing. These options allow me to edit the Mesh of the liquid and change how it appears. The settings on the right side are what I selected for a smooth liquid.

Cacheing the mesh is the next step. We do this by using the Alembic Cache. I clicked on Cache > Alembic > Export selection to alembic. I had to make sure the timeline was at 1 otherwise it would not work.

Finally I began looking at the render settings and to begin rendering the liquid. I went into the Bifrost Liquid and clicked on the Processing options and changed them all.
Jenga Tower Recreation

First things first is I needed to recreate the scene. I made a table and the Jenga blocks. I then rearranged the tower to match that of the one in the video.

Next I selected all the bricks and went to to Bullet > Active Rigid Body. This then makes all the bricks simulate in a realistic way. I originally tried to apply a passive rigid body to the whole table however it did not work, the bricks kept on falling through the table. To fix this I placed a plane on top of the table.

These are the settings I applied to the the bricks when I applied the Create Rigid Body.

This is the settings I applied to the plane. I did the same as i did with the bricks but I changed two settings. I changed the collider shape type to Mesh. I also changed the body type to static body.

Next I selected the brick that I pulled out in the video and I added in some Initial velocity to it. I did this within the bullet rigid body shape tab in the attribute editor. I changed the initial velocity to -30. This makes the brick fly out underneath. The rest of the bricks then fall down.

The bricks falled down slowly as the gravity was to low and the bricks where falling as if they where a lot bigger then they where. So next I changed the gravity to -60 as this was the gravity that made the bricks fall the same as they did in the video.
This is the final video. I think it recreates the animation pretty well. I tried to make the animation scene look exactly like the real objects in the actual footage. However it did not very good. So I went with colours that help the Jenga blocks stand out.
Ocean

I began by creating a pane. I clicked on the Boss tab and opened the settings. Then with the plane selected I clicked n the blue circle icon to create a wave. On the right of the screen is all the settings that can be changed.
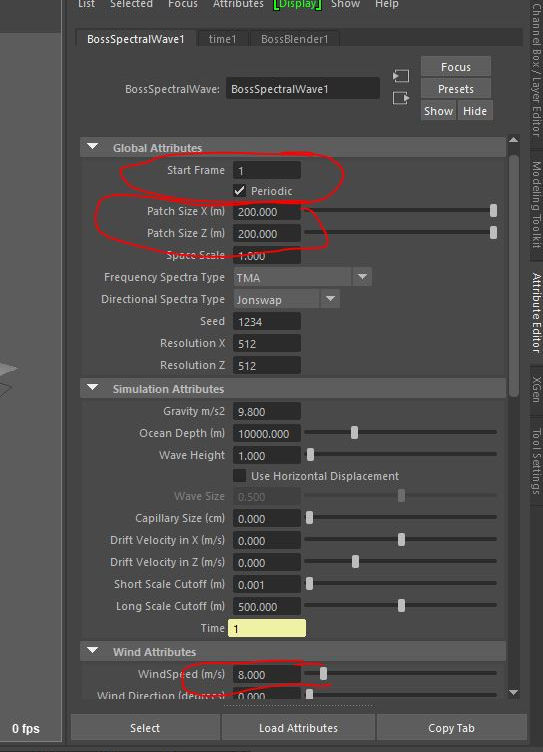
All of the settings that I changed are circled in the image.

Next I cached the scene. I did this by opening the boss editor and then clicking on Cache all.

Next I created particle under the waves. I did this by creating a Bifrost fluid by going to Bifrost Fluid > Liquids. Next I selected the plane and Bifrostfluid1 and clicked on Bifrost fluid > Guide. After this I created a cube, I then selected the cube and the Bifrostliquid and went to Bifrost Fluid > Emission guide. This then allowed the particles to stay under the surface of the plane.
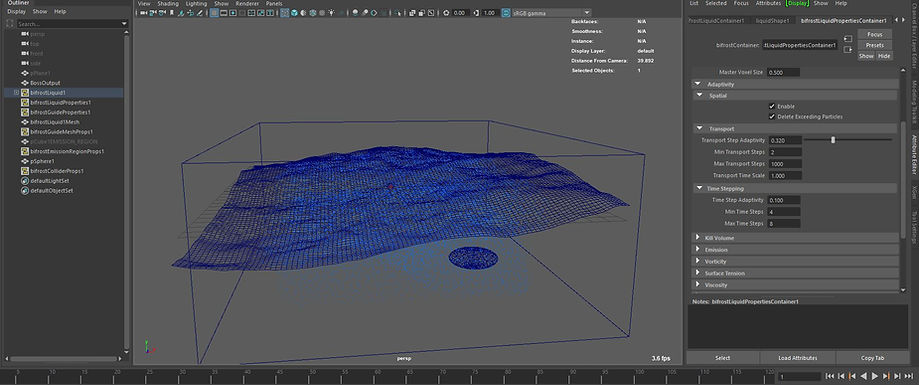
Next I created a squashed sphere and animated i coming out of the water. Next I highlighted the sphere and the particles box and went to Bifrost Fluid > Collision Next I went into the settings of the BifrostLiquidProperties And changed the Min transport steps to 2, Min time steps to 4 and the Max time steps 8. Next I cached the particles by clikcing on the box and going to Bifrost Fluids > Compute and Cache to disk.

My next step was to create a Killplane, I added this by clicking on the Bifrost liquid and then I went to Bifrost Fluids > Kill Plane. Within the BifrostEmissionRegion I went to the Emissionregionprop settings and changed the settings of the death age to 2. Then finally I went to Bifrost FLuids > Compute and cache to disk. This means the animation does not need to be animated.
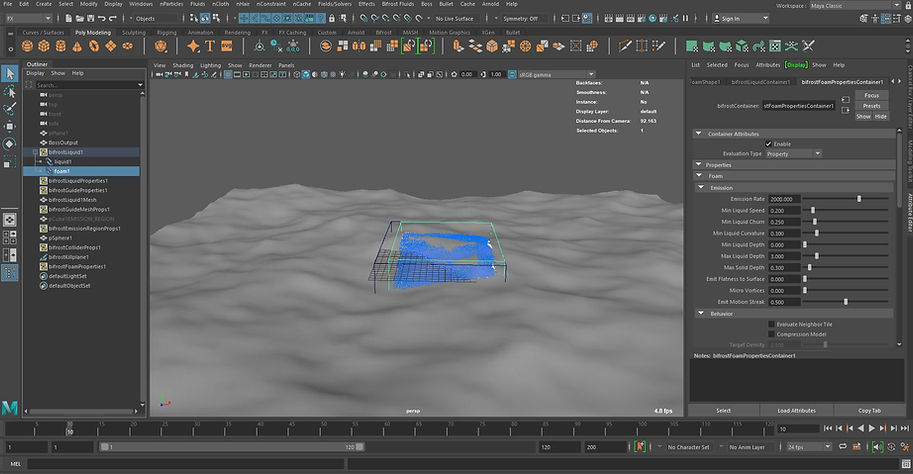
Next I added in a foam fluid. I added this by going to Bifrost Fluid > Foam. Next within the foam properties I changed the Emisstion rate to 2000 and the Min Liquid Chirm to oo.250.
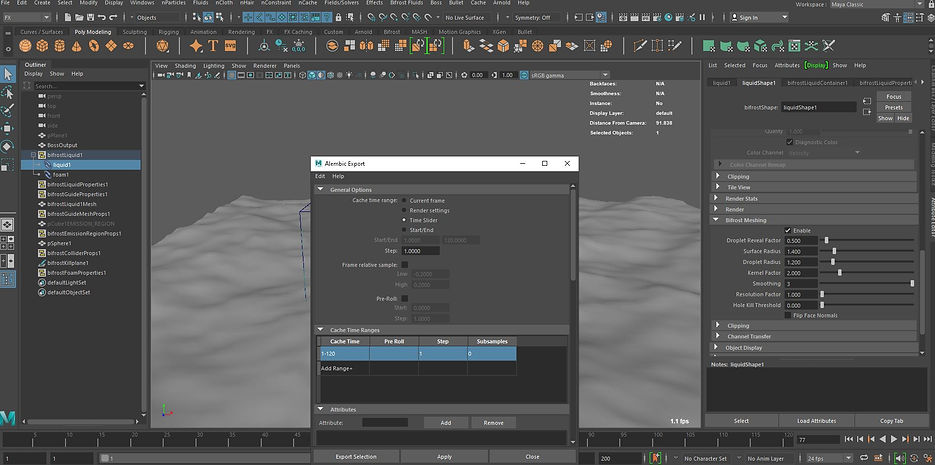
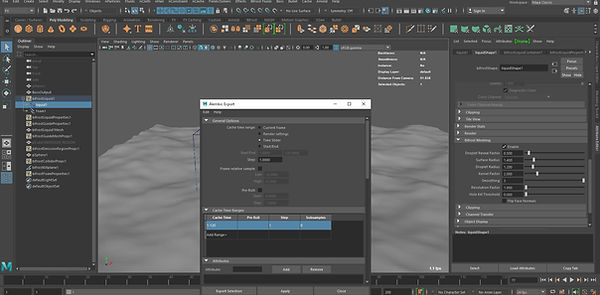
Next I created an Alembic Cache. I did this by going to Cache > Alembic Cache > Almbic Export. I then clicked on Export selection.

Here is how the ocean looked. I sadly couldn't get the textures to work. so i couldnt get a render of the scene.
Xgen

I began by created a plain and added a texture deform to it. Within the colour option I added in a noise colour which deformed the plain into a hill shape. I also created a small little bulb object that will act as a plant.

Next I selected the plain and with it selected I clicked on the Generate > Xgen editor. Which brings up the option to create a description. Once i have clicked on this I picked the options that i have selected on the screen.

Next I exported the tree object as an archive. I did this by selected the object and then on the generate tab I clicked on export selection to archives. Once I picked a custom location and placed it into a xgen folder. I then added the archieve into the archive files on the right of the screen.
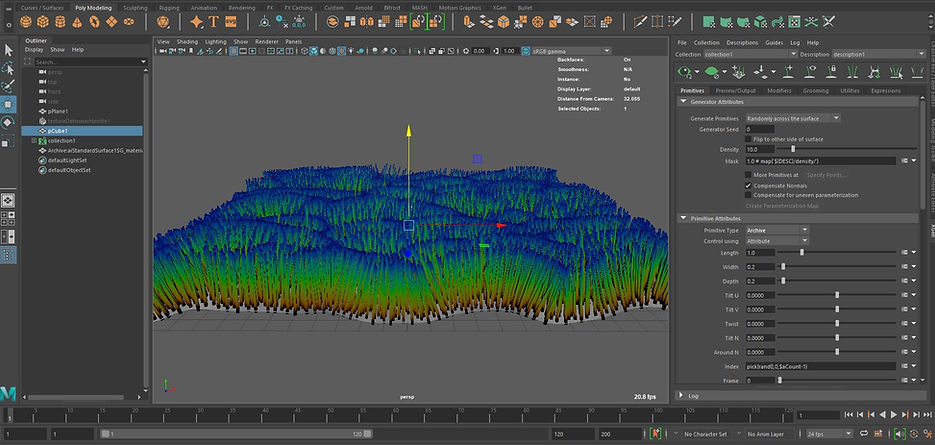
Once added to the archieve the tree will be placed on the plane. All the settings that i will need are on the right of the screen. I added set the density to 100.
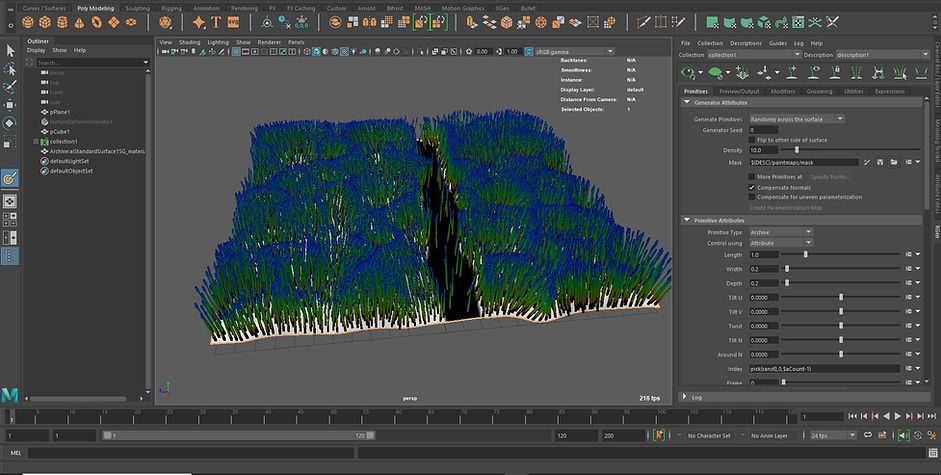
Next I created a density map. I did this by clicking on the arrow on the far right of the density options. Once clicked on i can paint a black line which will get rid of the trees in that area. Once the black line has been drawn I have to click on the save to button to see the results.

Next I created a mask within the length option. The darker the colour the shorter the object. So I added different levels of colour in a circle and used the blur brush to mix the colours to create a smooth transition. I can also add expressions within the button next to the arrow however I cant open this tool on my computer for some reason.
Hair

I selected the model I wanted to apply the hair to.

There are many options to use for editing the Xgen tools. I added guides as of a way to control the hair. I added them by clicking on the option that is circled.
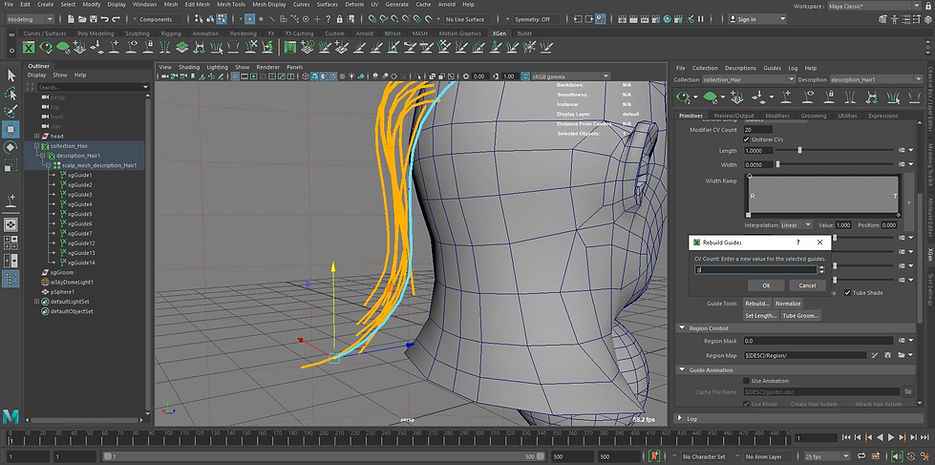
Once I have placed a guide I can move it around using the guide points. more points can be added by going down to the guide tools in the primitives tool bar and click on rebuild. This allows me to add more points to 8 which allows more editing to the guides

Once I have placed down a guide I can click on the option to mirror the guide. This is helpful to keep the guide evenly layed out and spread the guides out all around to make it easier to move around the hair.

Using the tool within the Xgen tool bar I am able to move multiple guides at once and can move the pony tail easily around.

I can also add modifiers to the hair. There are multiple options i can choose from. The ones i picked is the Noise, Coil and Clumping.

The clump modifier sticks all the hair to the guide. The clump scale graph allows me to edit the hair at different length.
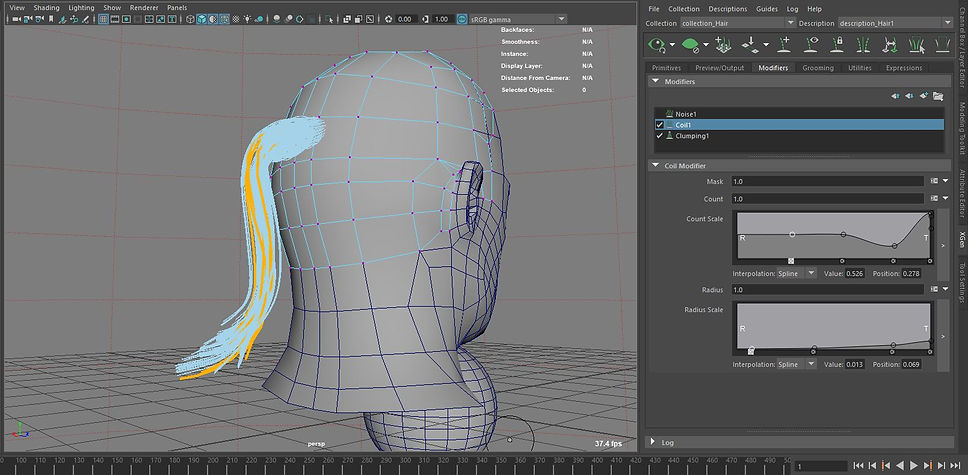
The coil modifier allows me to to adjust how the hair coils around and twists. So i can change the style of the hair.
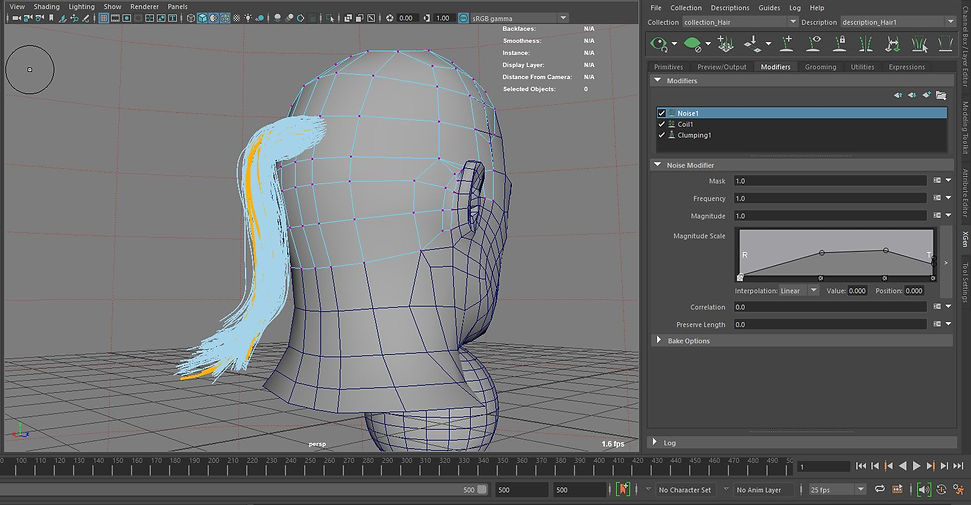
I added a noise modifier to add volume to the hair.
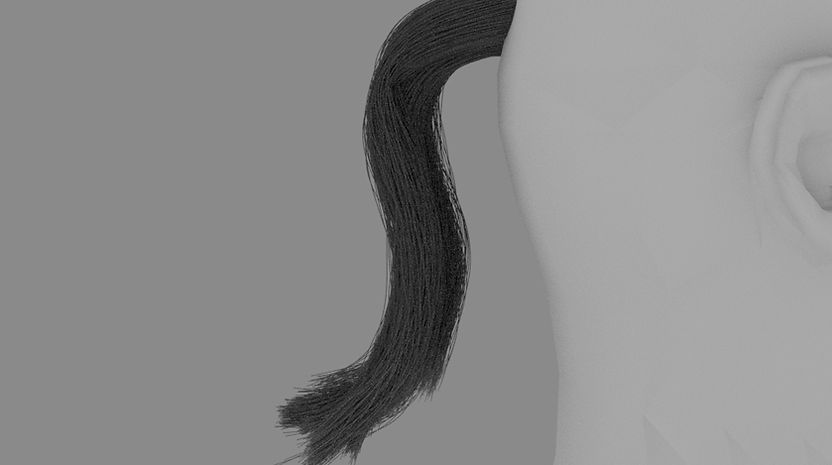
Here is the hair after i rendered it and imcreased the density
Bifrost Graph
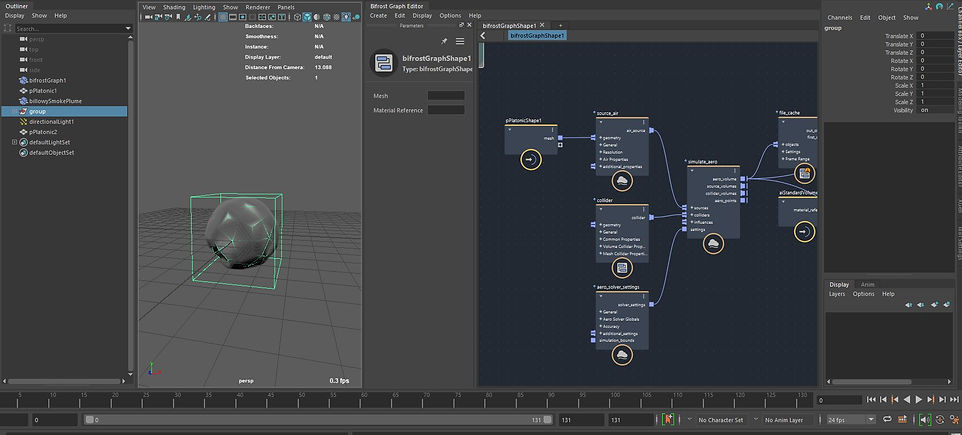
I am now using the Bifrost graph. The Bifrost graph is a great way to great effects using a easy graph to create it. I began by creating a Platonic, this will be the shape that emits the smoke. To bring the Platonic into the graph I used the middle mouse button and dragged it into the graph. I began by bringing in a basic Aero Graph. I got this graph by pressing the tab button and following this path. Simulation > Aero > Basic Aero Graph. This graph can also be created manally however it is easier to add it in this way.

These are all the nodes that come with the Aero graph. Source Air, Collider, Simulate aero and aero Solver Settings.
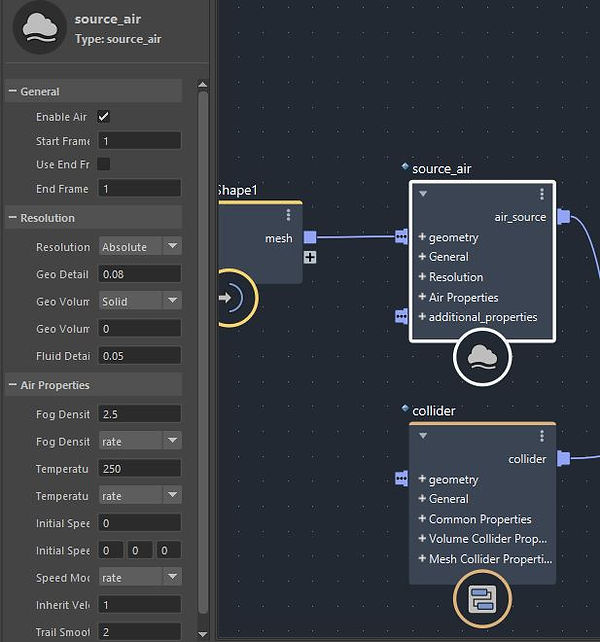

I began by working on the source Air, the settings can be seen on the left. These are what can adjust the air around the smoke. I also added in a volume scope to the graph. The volume graph allows me to the pixels the smoke is working in. These boxes are what the source air work in. The source air can edit the thickness of the smoke. Temperature determine how fast the smoke rises, if the smoke is in minus numbers then the smoke will fall.
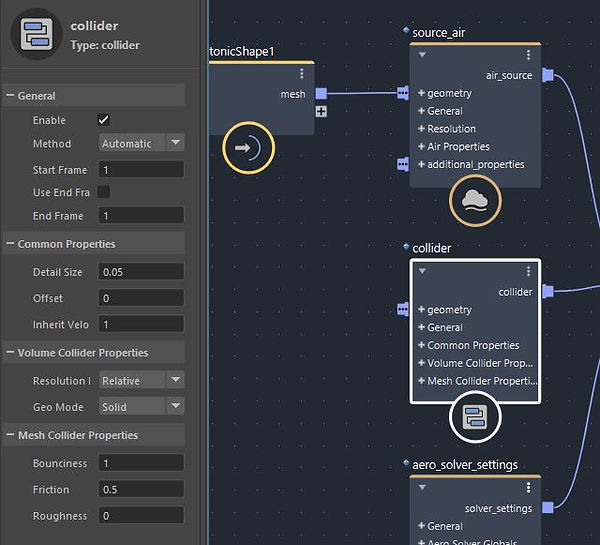
The collider node is used to add objects into the scene and have the smoke interact with the object. For example move around it when it is rising. To add in an object all you have to do is bring an object into the graph and connect it to the geometry pipe.
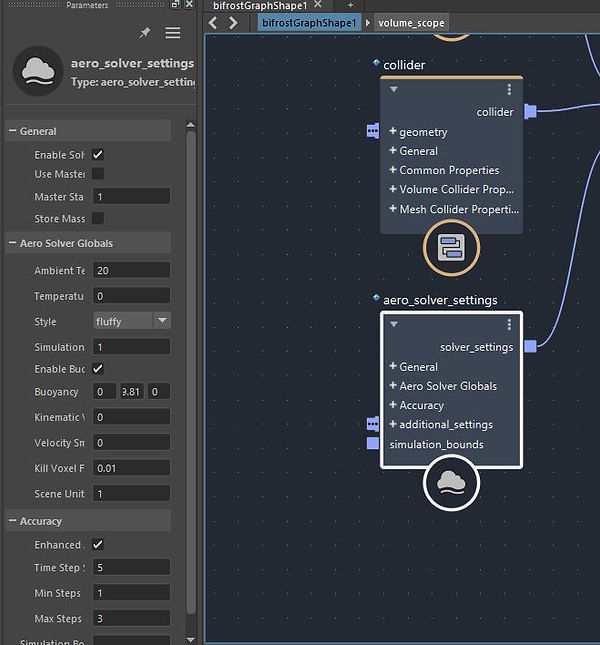
The next settings is the solver settings. These settings effect how the smoke simulates whist it is rising, so if the smoke twirls around and how it acts. The biggest option in the settings is the style, I put it to fluffy, this makes the smoke look fluffy and realistic as it rises.
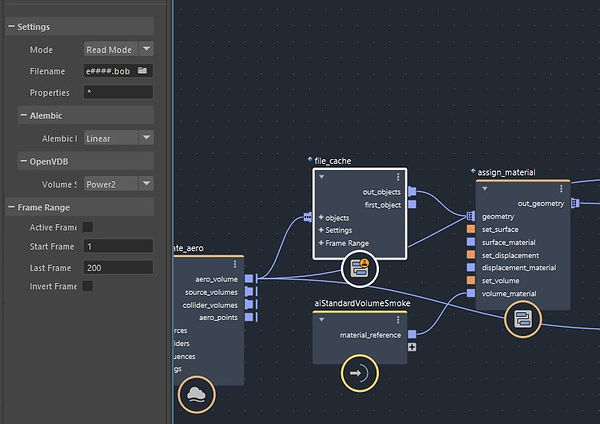
Next i added a cache node. A cache stops Maya from having to simulate the whole scene when i play the scene. It saves the simulation and play it through the whole way through. The mode option in the settings can be put on read or write. Write will write out files of the simulation and when the mode is changed to Read Maya will read the files and will play it through without creating anew simulation. When saving the file the file needs to be saved with ####.bob.

Next I applied a material to the smoke. I did this by adding a assign material node. I plugged the file cache node to the geometry part of the assign material. I assigned the out geometry to the output node. The material node is added differently to the standard material. I created a Standard Volume smoke within the Hyper shade. I then connected it to the volume material.

These are the settings of the material that I applied to the smoke.


I next added four Vary source property to the graph, this essentially create random patterns within the smoke. The different property's I added is Initial speed, Initial speed direction, temperature and fog density. Within three of the options I added in a min and a max value. However in the initial speed direction I had to change it to a three option settings as it it direction ad it has to effect three different settings.

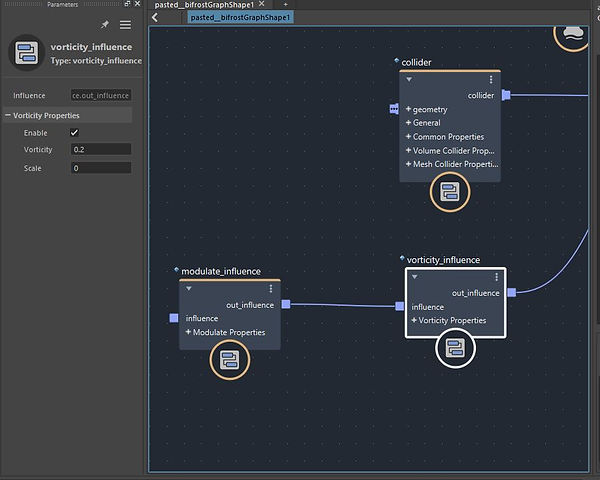
I adding in some influence nodes.

I added in some directional lights. This adds in better shadows to the smoke.
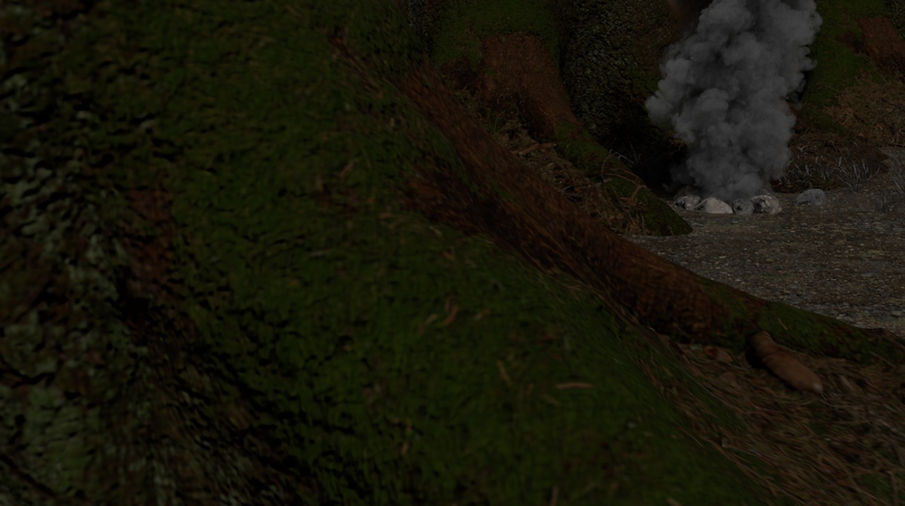
I added the smoke to a scene after caching it. I Brought in tree from megascan to add to the scene.
Graph Particles

I began by creating a Platonic solid, I gave it multiple subdivisions up to 20 and changed the subdivision mode to triangles. This is because quads will crash the computer. I created a basic particle graph.

These are the particle solver settings that I applied to the simulation.
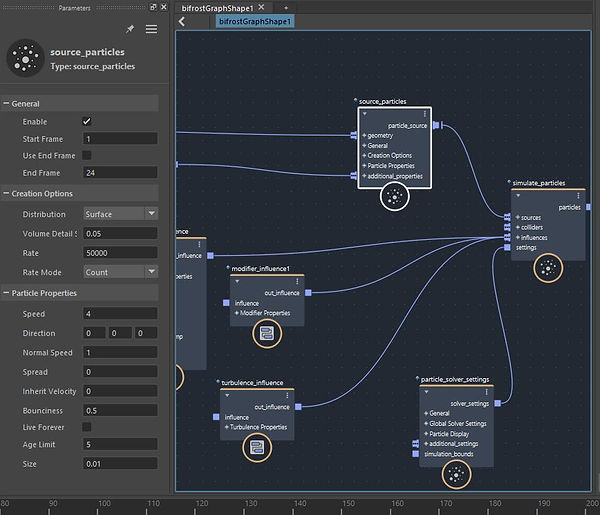
These are the source particles settings I applied to the simulation.

Next I added the colour property's to the simulation I did this by right clicking on the additional property's and adding a set property node. to add the colour property I had to write "Color" into the key option. However due to it being colour the values need to be changed from one option to math: float 4 to give me the options of red, green, blue and Alpha.

The next step is to make the colours of the particles become inherited from the colour of the object. I chose red. to do this a paint tool needs to be used and I painted it fully red. to make the colour inherited click on Mesh Display > Colour Set Editor. within the set editor I change the name of the colour to the same as the one in set property.
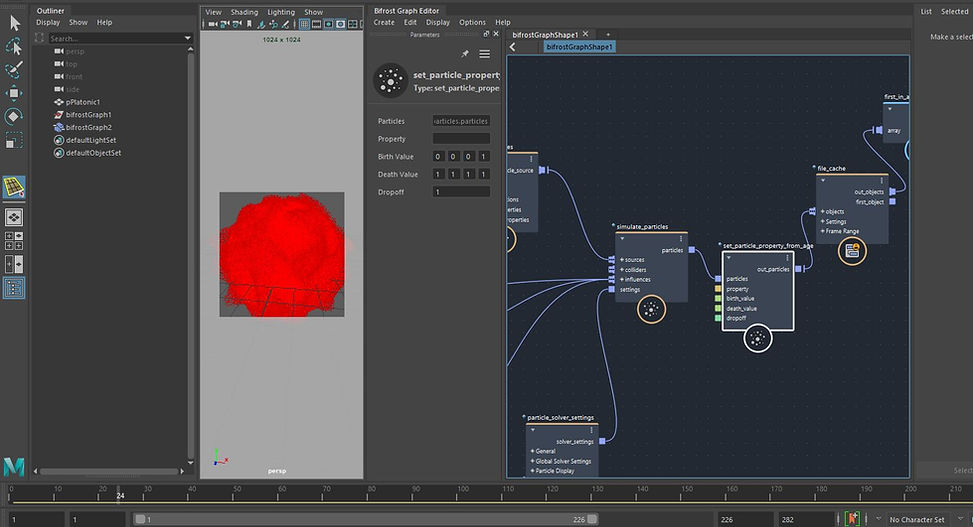
The next step is to add in a set particle property from age. This allows me to amke the colour change the longer the particle lives for.
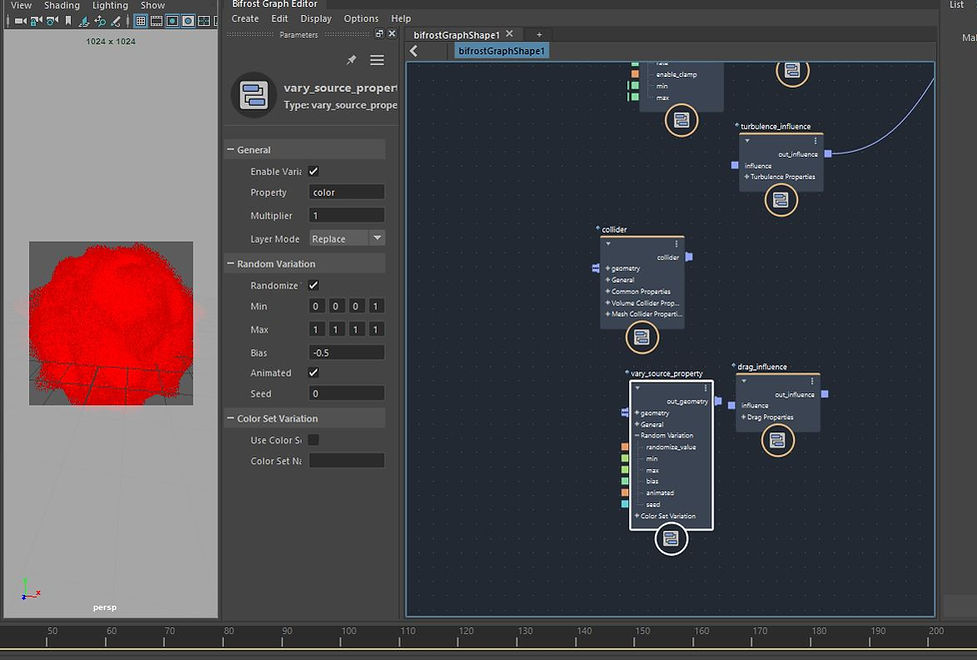
It wasn't used in the final piece but next I can add in a Vary source property. This allows the colour to change overtime in multiple ways instead of just one.
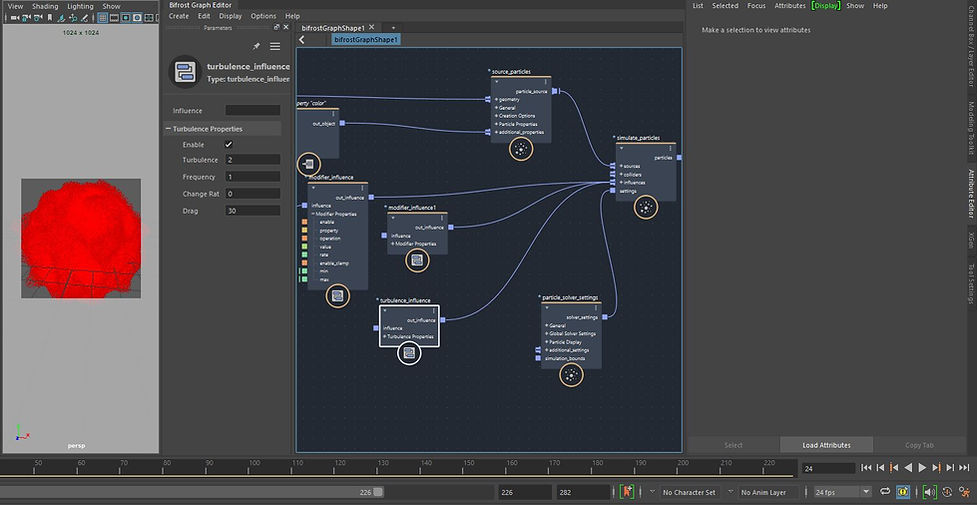
Next I created a turbulence influence. This allows me to effect the particles and move them in a way that I want. The settings I applied are shown on the screen.
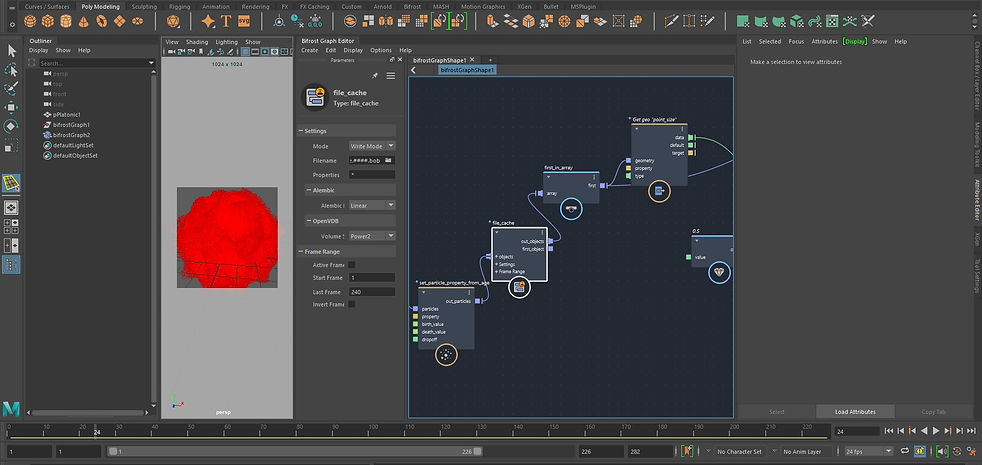

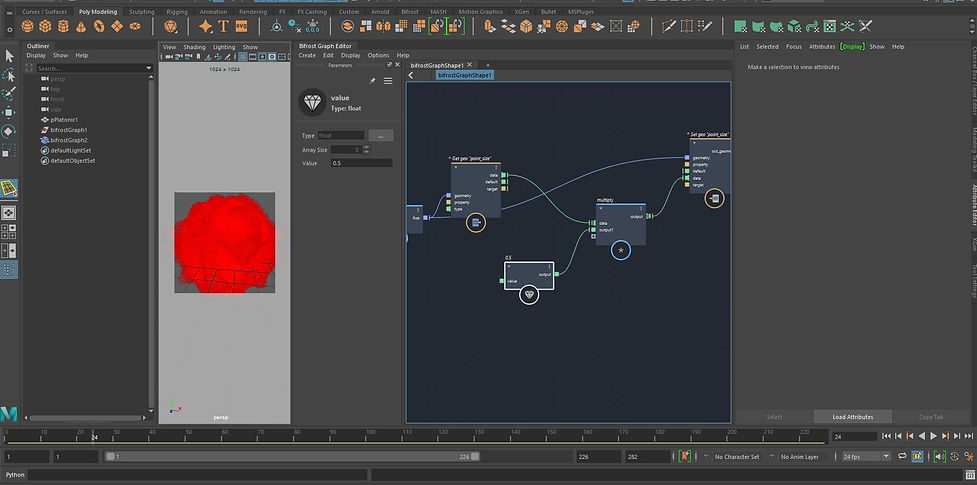

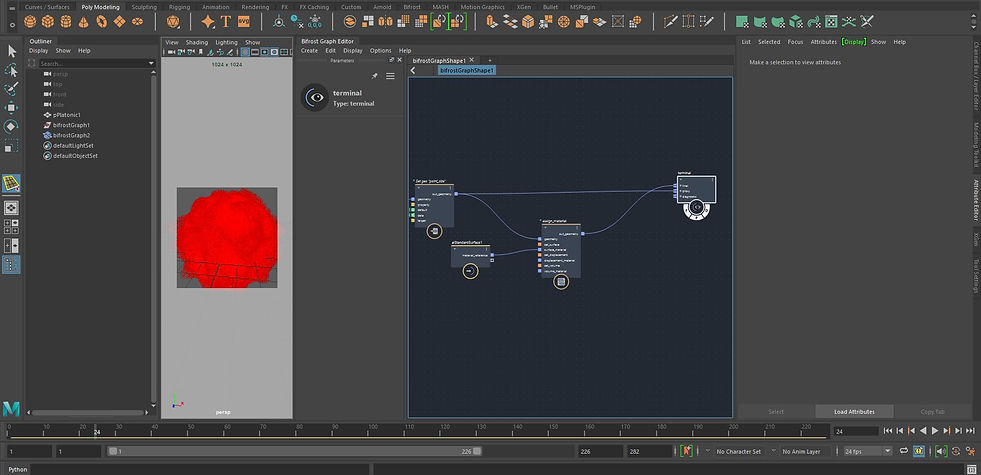
The next step is to apply all the nodes for rendering. I began by adding in a File Cache node and chose its file path. Next I added in first in array node and connected this to a Get geo "Point Size". The First in Array node also connects to the Set Geo "Point size", which I will mention in the minute.
Next I added in a Multiply node connected to a Value node. The Multiply then connected to the Set Geo "Point Size". This then connected to the Assign materiel to apply martials to the particles and then finally connects to a terminal.
Bifrost graph MPM

I began by adding all the Source MPM off all four of the effects i wanted to make. That being Snow, Sand, Fluid and Constrain which is for cloth.

I connected a mesh to each of the mpm and added a set property to adjust the colour of each efect.

I connected the two mesh's that will be used as a collider to a collider node.


Here is all the settings of each of the different MPMs. Each one has slightly different settings


The cloth tear is a little more complicated then the other three MPM's. I used a rectangle to pull and tear it. When the cloth mesh in in the rectangle when you connect it to the MPM cloth it will move with it. tearing it.
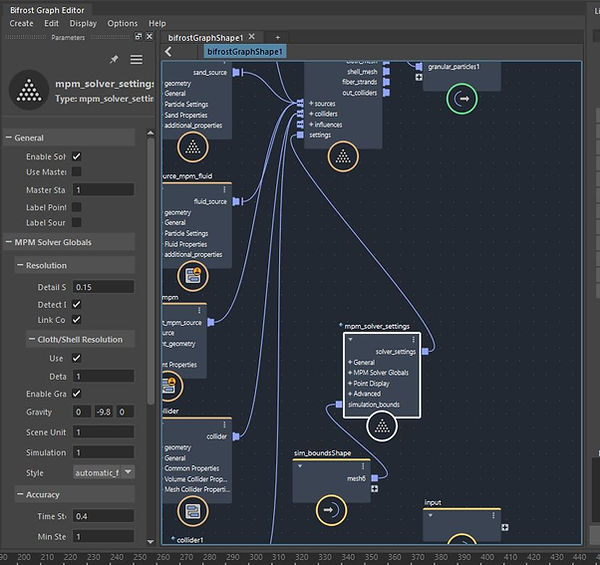

Next is the mpm solver settings. This allows me to adjust the overall settings of all the four MPms. The settings that i picked are shown above. The settings allow me to adjust the gravity, how much detail I want and more.
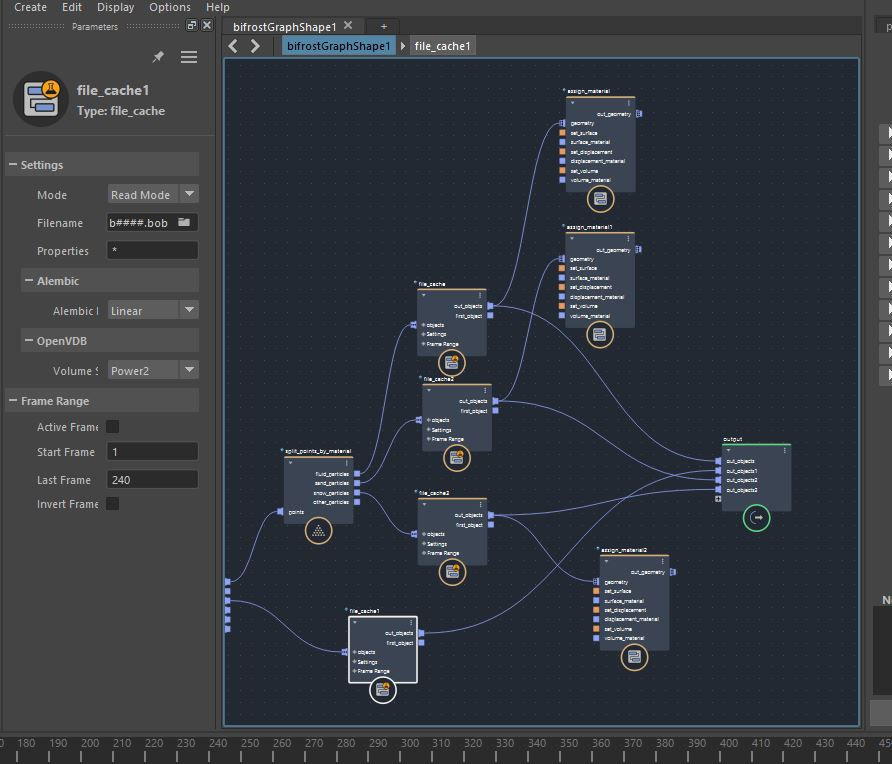
The final stage is to create a cache. However do this and then make it so it is able to apply material to each separate material. To do this I added a Split points by material I then connected each of the separate martials to each after i had placed the cache.
Assignment: Cup Strand

In this Bifrost graph I will be creating stands which go onto objects. In this case I place it onto a cup. I began by bringing the cup mesh onto the graph. I then connected this to a Scatter by "Number" This allows me to increase the number of strands on the cup.
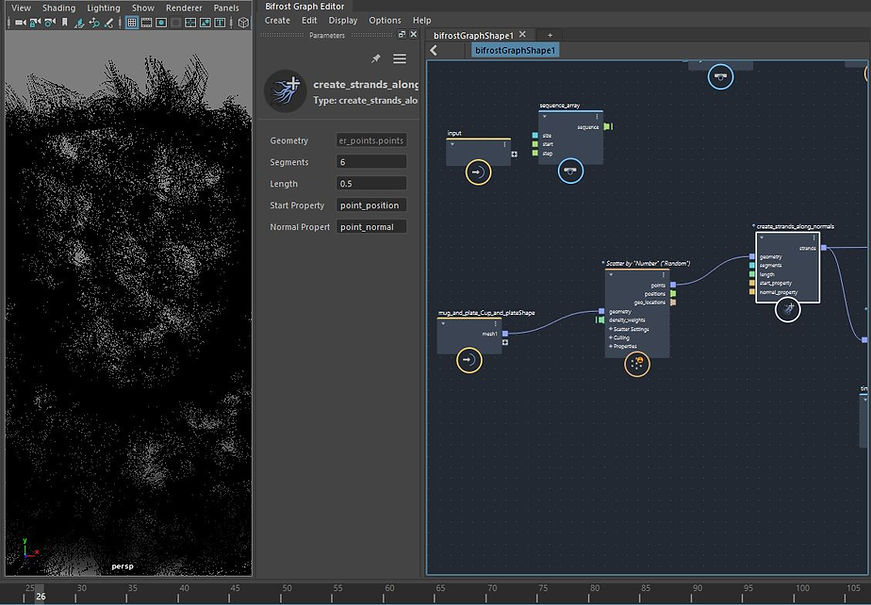
Next I added a Create strands along normal. This allows me to adjust the segments of the stand, this gives more detail to the strand. It also allows me to increase the length of the strand.
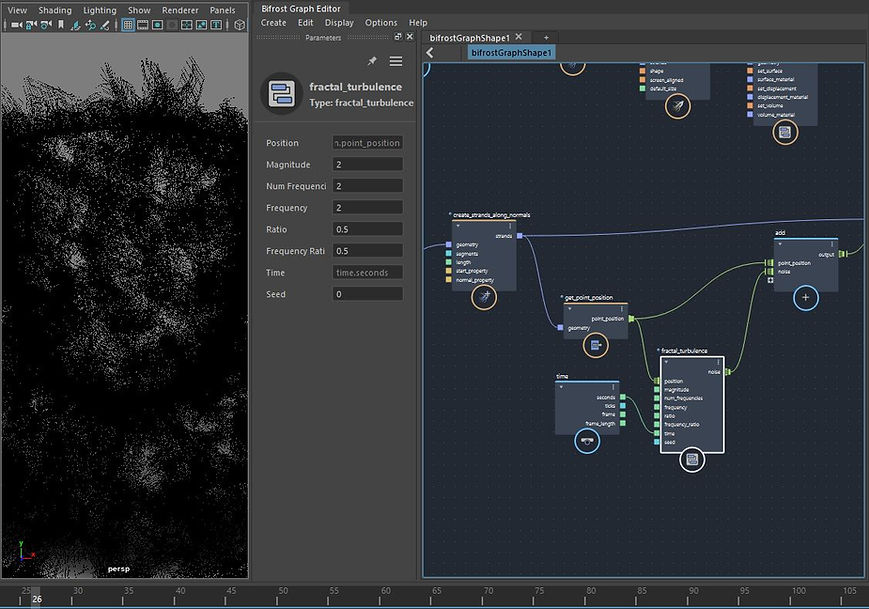
Next I added in a Get point position this returns the array of point positions for a geometric object. I connected this to a Fractal Turbulence node which moves and messes the strands around. giving it a more natural messy look. I added a time node to the time option to the turbulence node.

I then added in a add node this adds in the input values and then I connected a set point position this sets the point position property to the values of the array. Next i added in the set strands size which sets the shape.

I then added an assign material node which allows me to apply a material to the pipeline.

I then added the set strands size profile. This makes the hair move in random directions.
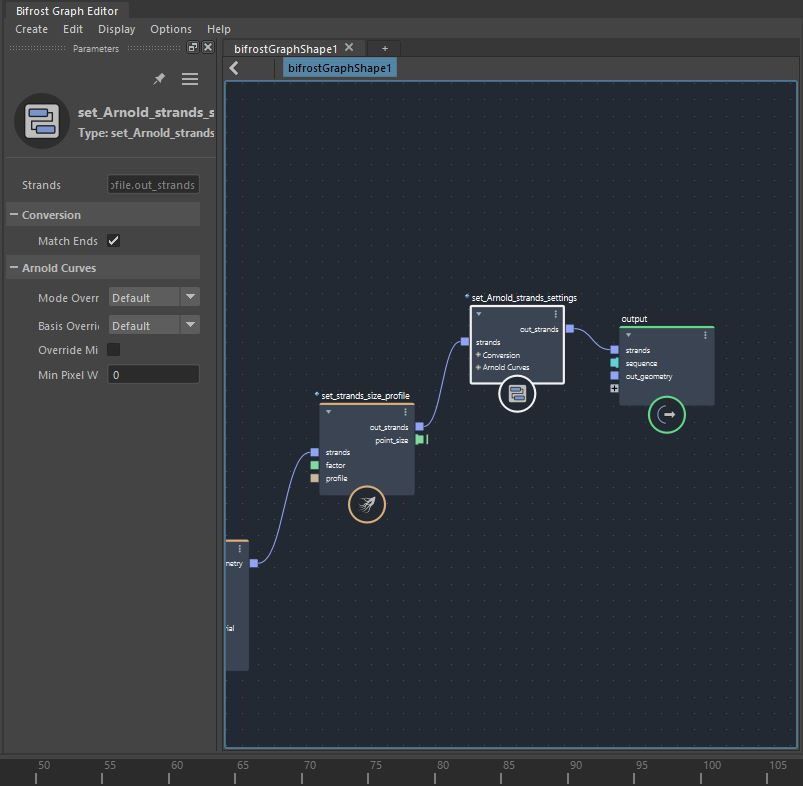
Next I added in a Set Arnold strand setting. What this does is make the Arnold strands become effected by the original Arnold settings.

Here is the complete pipeline.

Here is the final image.
Trails
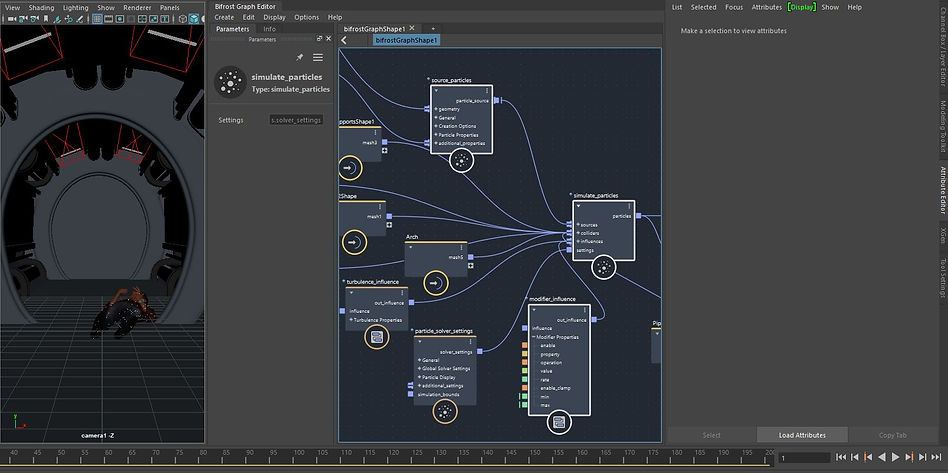
I began by creating a basic particle graph. This gives me Source Particles, Simulate particles and Modifier influence.

I Added in a create particles trails, this adds the trails into the scene.
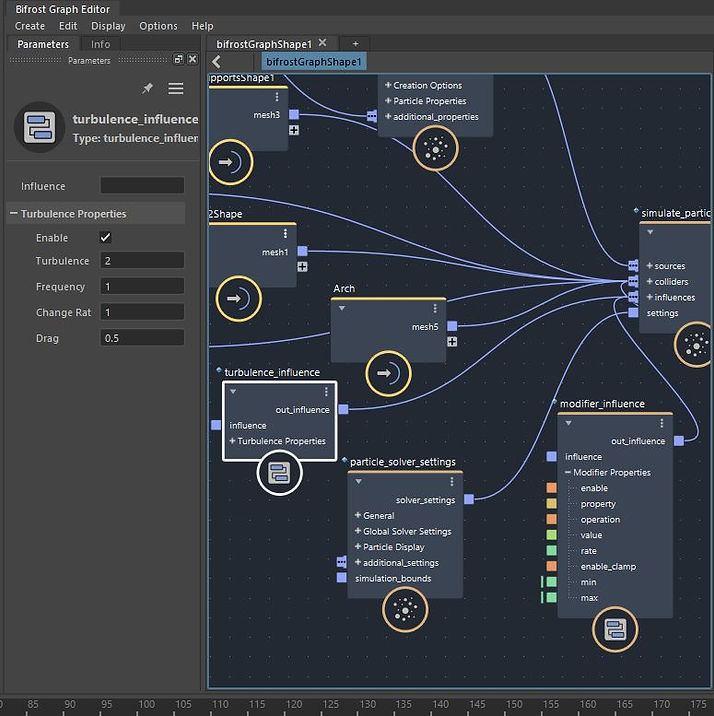
I added in a turbulence influence. This makes the particles move around randomly.
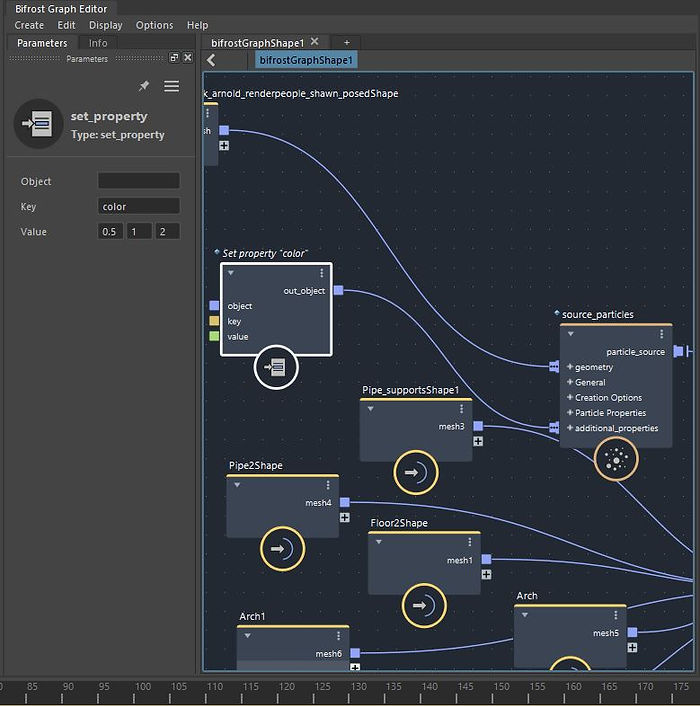
I then added a set property. I changed the key into color to change the colour of the trails. I also Changed the value to a float three to have the ability to change the colour.
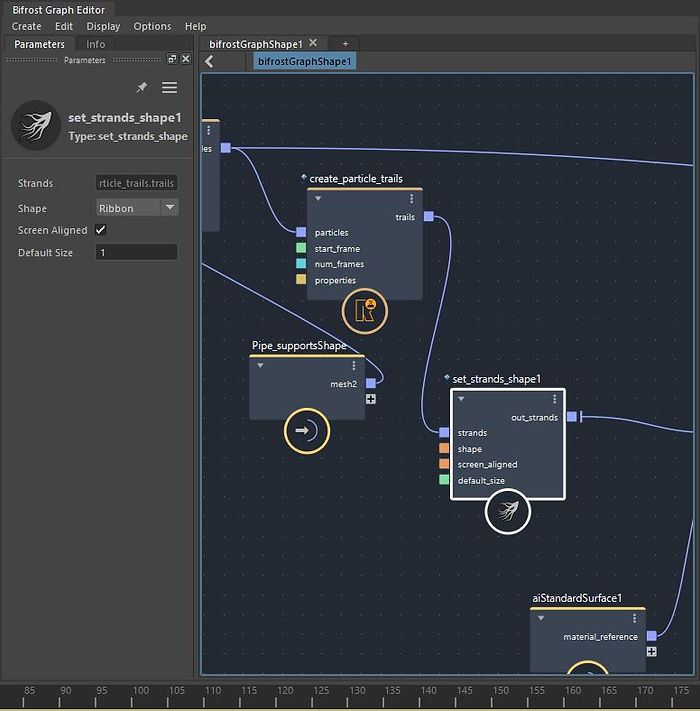
I added a set strand shape, this allows me to adjust how the trails look. I changed the shape to ribbon This is because I wanted to make a tentacle shape and the ribbon was the closest thing to that.

I next added a assign material and to that I connected an AIstandardsurface. This allows me to change the colour of the particles. Then with the assign material I added a set strands size profile. This allows me to edit the size of the strands.

Next I added the Arnold strands setting, this makes sure the that when i adjust the Arnold settings it will influence the settings of the strands as well.

Then finally when I made the scene I set the area in. Which was a spaceship corridor I imported some of the mesh's that are near the particles and added them as a collider. This means the particles will move around them and act accordingly.

This is the scene I built around the sim. I created a spaceship corroder and the particles coming out the guy are meant to be a alien growing out of his skin.
Here is the final video of this simulation.