StoneHenge Sky Replacement


I Changed the sky of the image from a sunny bright sky to gloomy dark one. I did this by deleting the sky and overlaying the stone henge image over the dark sky one.

Hybrid Animals


In this image I combined a hamster with a tarantula. I used the mask to to fa the hamster head in to he body of the spider.


In this image I combined a dolphin with a pug and attempted to change the colour of the pug to match the grey of the dolphin but this was really difficult due to the black colour.
Green screen
To get rid of the green behind the lady I went to the Select tab and when it dropped down I selected colour range. I then sampled the green colour and adjusted the fuzziness until there was no noise, I clicked the invert box then applied it. All the green was gone apart from around the edges of the women. To get rid of this I clicked the Adjustments tab, then Hue/Saturation. Then clicked on the top left hand symbol. I then went highlighted the green areas and dragged to the left.


Fake news Ideas
1. Extinct animal spotted in an area.
2. dangerous animal spotted.
3. Giant Rat
4. Giant cat
To make it realistic I am not going to say that a dinosaur has been spotted as that is unrealistic and has been done loads of times before. However if I create fake news on a animal that has gone extinct only 10,000 years ago. However, I will have to research which animals went extinct I the last 10,000 years. Another idea is to create a image of a animal that is not native to England like a tiger, lion or Lynx.
Animals that has gone extinct in he last 10,000 years:
-
Tasmanian wolf - 1936
-
Stella Sea Cow - 1768
-
Galápagos giant rat - 1500
I took pictures for the settings of my images. The settings I choose was in my back garden as it looks run down and is a good setting for a large rat type image. I started of by getting the main image of my garden, once in photoshop I went to the blending option and selected the colour overlay and set it to black. I then reduced the intensity of the black until the original image was darker. I than used the quick select tool to select the windows and then proceeded to change the brightness and saturation to get a orange glow. I got the picture of the rat and pasted it into the photo. I had to change the brightness of the rat to match the background. I did this the same way as the way I changed the background.
When it came to editing the rat I created a glow on the back go the rat to reflect the light coming from the window. To create this effect I used the quick select tool to select the rat (this made it easier to edit and did not effect the background) I used the brush tool with a low opacity and draw on he glow until it looked good.
I then placed the rat by the tire and erased the rest of the body until the head was just popping out I originally was gonna have the rat with its whole body on show however I looked better with most of the body behind the tire and looked a lot more convincing.


This piece of work is still technically a work in progress as I do wish to improve however I got stuck therefore needed some help. However the image on the left is a image of my cat laying on a bed and in the left I have enlarged her to make her look like a massive cat. I did this by selecting her with the quick select tool and then enlarging her with the transform tool. The part of the image that I need to change is maybe the size of her as it does not look like it fits into the image perfectly. I think I need some help blending the cat with the image making it look natural.


With this Photoshop image I added in a whale tail breaching out of the river Thames. I did this by going to the river and taking an image of the river Thames. I then went online and downloaded a image of a whale tail breaching out the water. I tried to add the ripple effect around the area of the tail entering the water but I found it difficult to blend the two together and it ended up looking out of place. I am not the greatest on Photoshop so would like to make this image better once I am better at photoshop. Overall , I think this piece is effective but could look more realistic.

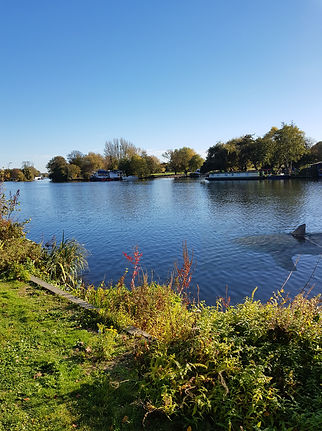
This piece of work is a combination of a picture I took of the river Thames and a shark picture I found online. I placed the shark image over the photo I took and it fitted like a glove. All I had to do was get rid of the sky and horizon using the mask tool I also used to stamp too to create more defined ripples in the water. With this piece the fin at the bottom of the shark does not look complete within the scene and I struggled to make it look right without ruining the image, this is the one part I would change if I could.

Maya Model - Bond Gadget
I created a Maya model that is at first a simple house hold object and I chose to create a remote.

To created this by getting a box and creating the size to match the size of the remote ( I used the reference image above for that. I used edge loops to round the edges of the remote to give it a curved look. At the front of the remote there is the area where the laser comes from. To create this I selected a circle of faces dead on the front of the remote, I than extruded it in reduced the size of the face and extruded it out making a little bump. Making the buttons was easy as I just followed the buttons on the picture, following the layout. I did this by copy the buttons that are the same size and moving them to the appropriate places.

To add the bond effect onto my model I turned the remote into a gun by adding in a handle. This was easy to make all I did was extruded the bottom out and resized all the areas to match the shape of the handle on the image.


I then began to smooth out the handle of the gun by moving the vertexes in a way to create slopped edge. I also connected the top of the trigger area to the rest of the model. I did this by selecting two vertexes and connecting them together with the merge tool. I also began to add materials to the model. This took time as it took time to select the correct settings for each material to make it look accurate.

I then modelled a tripod for the gun to stand on. I mainly added this in to allow the model to look okay in the environment it will be placed in. I placed a light. I then added some rubber bits to the handle as well as a screw to add in more detail

I then added in lights to the scene to be able to render the image properly. The light I added was a Arnold globe light and the and downloaded a scene to add the light which added in the lighting for the scene for me.

Here is an early render of my gun

This is a render of my model in a environment, the main issue I am having with this as this is from HDRI Haven all the environments do not fit my model which is a gun. As the gun looks massive or does not look right in the scene.

This is my final image of the model in the gun shop. I think I modelled the gun well however, I do not think it looks complete in the image and looks out of place and this is the main thing I do not like.
I also created a UV for the buttons on my model.

All I had to UV was the buttons, which was a pain to do because Maya crashed once meaning I had to re-place everything again. I also cheated in a sense as I only placed the text on one face as I didn't need to on any others. Even though adding the numbers and lettering onto the buttons was nothing to big it still added a nice amount of detail.
Final Rendered Models


I am happy with how my model has turned out. The renders look really realistic with all the shadows and fit into the scene nicely. The second render could be better placed in the mage but apart from that I really like how this has turned out.
American rooftop
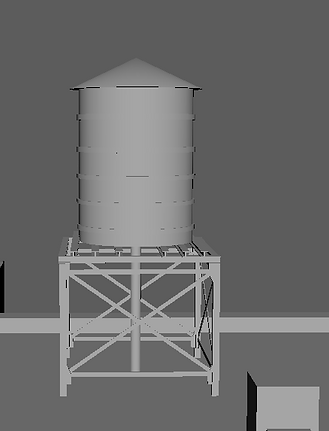

I created a alter tower the add to the top of my rooftop. This took a while as I wanted to add in all the details to it to make it look realistic.


I created an air con machine. This was simple to make and did not take me too long as it was simple to make because it was made from a cube and all the detail I extruded out. I used a simple metallic material from the material menu in Maya. I did this because they where far way from the image which meant they did not have to be detailed.

I created another type of air vent that is a small version of the original. This one is placed a lot around the scene. This part is not a large part of the image but I added them just to add a little bit of detail to the rooftops

Here is my current birds eye view of my map it obviously has a lot more work to be done to it.


I created a sky light that this was simple to make as I got a cube and I increased the length of the cube to create a cuboid. I then put in edge loops to create six different squares. I extruded the square to create a window shape.

I created a air vent that is a larger version of the my smaller one. I attached another set of air vents to it. This was made with a simple cube that I extruded out and lengthened to create a cuboid. I added in small little supports that are made of simple cubes that have been flattened. (This is currently half finished) I didn't have to add much detail to this part as it was far way and there is no point of me wasting time on adding detail.
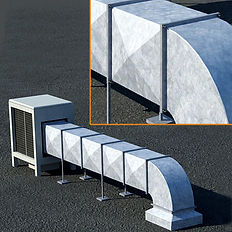


I created a billboard for adverts and this was possible one of the more complex models in my scene. AS there is multiple models all in one. With the beams being all the same and made from a cube that has been extruded out and extruded in. The lights in front of the billboard are made out of a simple cube that has been reshaped with edge loop. Even though the billboard is far away from the camera it still is a large part of the image. The only issue I found from this model is the billboard I made is one in which is on the ground not on top of the building,

I created a large air con unit. This was simply made out of cubes the large base air is a cube that I have reshaped with edge loops. The fans are made of cylinders and cubes. With the cubes beijg the fan blade and fan protection cross. and the cylinder being the round area around the fan.


I created a fire exit stair case which took some time but it is made out of the same cube that has been duplicated multiple time and reshaped.

This is my overall view of my current city the main focus point is the bundle of building in the middle.

This was an early render of my Rooftops. I kept this shape but ended up deleting a lot of the buildings as I felt the scene was to crowded


I created skyscraper windows and these ended up being the most important part of my scene. This is because they take up a large part of my scene because the reflections of the windows works with the scene so well. I used the windows for the bag ground to make the scene look bigger and was used closer to the camera as it took up a lot of space.
I created them by simply flatterning the window down and then extruded it to get the edges of the windows. This is why I love the windows as they are so effectic yet so simple.


I created a telephone tower and to be honest this was one of the easiest models to texture as it was all done within Maya using there material editor.
Creating it as well was very simple as like most of the assets in my scene it was completed by created one piece an then duplicating it.

This is one of the final renders before my scene was completed, All I needed to do was clean up the shot by getting rid of buildings that where not necessary within the shot
Final renders


These are my final renders, which to be honest I feel like could have done better. I really struggled with the texturing and I feel like this is where this ruined the image for me. I like the windows on the sky scrapers though as it reflects the lights very well. However the second render the concrete on the side is very blurry. This is where I need to work on sorting out the UV and put more time into cleaning them up.
WW2 Scene
I am super fascinated by WW2 vehicles so when I got the opportunity to create what I wanted I jumped to create a WW2 scene.
The Sherman tank

This the image I used to understand how the tank looked.
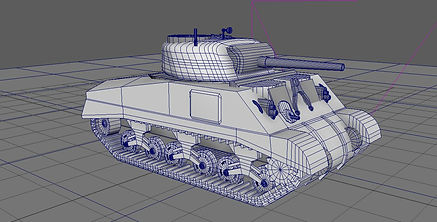


I Really enjoyed making this tank and am super happy with how it turned out. It is possibly my best model to date and to be honest it did not take me that long. All together it took me around 6 hours to make which is good for me at least.
Most of the tank was easy to make especially the main frame as it is simply just a square that has a few extra edge loops. The area that was really difficult to make was the wheels which image three shows. This is because compared to the rest of the tank it was pretty complicated.

This is my tank within substance painter after it had been textured. Which was difficult to get accurate as I have not really used substance painter before. However I tired to experiment with different textures and tools within the software. Such as the bullet holes, dirt and scratches.

This is the tank once I had applied the texture to it within Maya. I do think this could have turned out better. Because I don't think it looks like the real thing but considering I haven't used substance painter much before it turned out decent.
MG42

I really like the MG42 is think it is possible one of the best guns from WW2

I am super happy with how this model turned out. I think it looks very similar to the rea thing. It was really easy to make as well due to the fact when you break it down it is a very simple shape.

Within Substance painter I really like this texture. As I put in weathering on the metal by changing the colours

For some reason within Maya it looked pretty poor compared to within Substance painter. This certainly an area I wish to improve on as I feel the models get ruined hen I texture them. So I wish to learn more how to texture properly
Hedgehog

The Hedgehog was a ww2 Barricade that was used to stop tanks and other vehicles.

I created mine and it was very simple with just a square that was stretched out and then flattened down the then duplicated it and placed them duplicates in the correct places.

This what my hedgehog looks like in Substance painter. I simply added the iron material to it. The only issue I have with this is that I added dirt and rust but for some reason in the final render it looks very clean and you can just about see the dirt.

once I had exported all the materials from substance painter this is what they look like with the texture on it. Not what I was hoping for but im still learning how Texturing works and am trying to improve.
Landscape

The landscape that I creative was not based of an image just general references . Which showed hills and craters from the bombs which is what I added. I think it looks good however I struggled to get the normal map to work correctly which was annoying. this meant it did not get the 3D affect I wanted. I got the image online and I got a texture of a forest floor. Even though it never really ended up like that, It more looked like a beach.
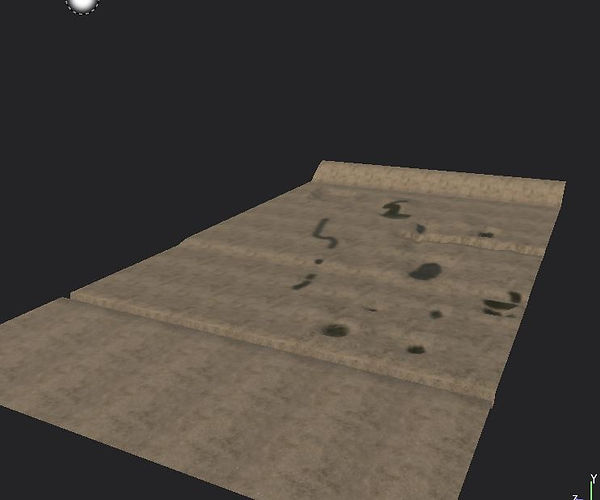
This is the landscape within substance painter, Like I said I downloaded a texture online of a forest floor, I added in the large hills once I had already added the texture. The dark areas where meant to be the bottom of craters from explotions

Trench
I created a trench which will be the subject of one of my final shots, I created sand bags which where simple to make. They where made out of squares that has curves throughout to make a bag shape. I then made a wooden plank for support for the trench. These where easy to make in substance painter. I used the fabric textures for the and bag to add in the bag looking affect and the wooden plank I used the wooden material and made it darker.


Bunker

This is the bunker that is where the MG42 is placed. I only made a high definition wall for the bottom wall as that is the only part you will see. Again I struggled to make the wall look affective in Maya which seemed to be a common issue that I had.
Lighting

I used the Sky dome light and then attach a HDRI to it which then created realistic lighting for me. I tried to put light within the bunker where the Gun was but it did not work.properlly but I found a way round it by getting rid of the top of the bunker which then allowed the light from the skydome to affect the gun.
Pre-Final Renders

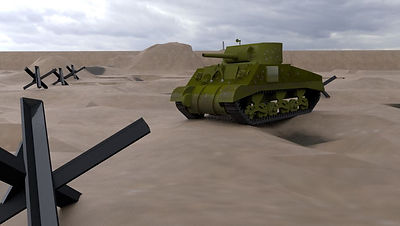

These are my final renders for my Tank project I feel I did a good job, However I do think I could have done better with the texturing. Like my last images with my roof tops. I struggled massively with the texturing. All though I say that I do think I have improved a lot since my last image as all my models have textures from substance painter. Rather then images online.
Final shots

In this shot I like the whole scene as I feel it reflects the effort I put into this project especially the tanks, However the part I do no like and wish to improve on is the MG42. This is because the model itself I really like, However the I could not get the lighting to work correctly as the scene within the bunker I wanted it to be dark but it was too dark and for some reason I could not get the lighting within the bunker to work how I wanted it too. Plus the texture on the Gun was not as accurate as I wanted it to be as when I transferred it I could not get it to look like how it looked in Substance Painter.
The second shot I like because the main focal point is the tanks and the sandbags. The sandbags are not the best model I have done as I want sure how to get it looking like a bag but did my best. However I like the texture on the sandbags with the bullet holes and the texture of it. However the texture on the floor did not turn out how I wanted it to as it was blurry and has not real detail compare to what I wanted it to be


This shot is similar to the second one However it is mainly there to showcase the Hedgehog model and the tank, It has the same issues as the second one but with the added fact that the texture on the hedgehog was to clean and I could have made it more weathered and dirty. I think what I can take from this is that my modelling skills are good however I need to work on my textures.