Nuke

Nuke is a programme that is industry standard and is used to composite media. It used a pipeline layout which makes an easy to see\use programme. Unlike After effects which can become complicated with its layer system Nuke can be sent to multiple teams which will edit there own area of the project to produce a final piece of work.

I did this task in class which was teaching me how to use the Merge Node. This allows me to connect two peices of media

This is the Merge Node which needs to be connected by the pipelines. which creates two images into one.

This is what the image looks like connected together.

The two pieces of media here is a school of fish and one single fish that takes up most of the screen. Using the merge node i merged the school of fish image to the main image.

This is what the image looked like with the school of fish connected to the main image.

This is how the image looked with the pig fish Mergede into the image.

This is what the overall pipeline looks like. My next take was again to use the merge Node to merge images which add different pieces of information the end image.

This is what the overall pipeline looks connected the different pieces of information. Each section edits the image in different ways and the the Merge node is connecting them all together.

This is the original image of the boy.

This is the background image which the boy get merged into


Each image is adding a different piece of information the the scene which when using a merge node connects all the images together creating the final image.
RotoScoping

I started by bring in the Rotoscope Node which is done using the shortcut the letter "O" on the keyboard. I started by drawing around the outline of the jelly beans.

The Copy node is used essentially as a merge layer.


I drew around each bean in the image using a different drawing tool each time to get good idea on how all of them worked.

Here i have drawn around all of the beans using different tools to do so.

I added a Grade node and a Contrast node connected by a merge node. This allowed me to add colour to my image and change its colour properties.

This is the final image with the constant node providing a blue background and the grade node changing the colour of the beans.
Rotoscope on a video

In this image it shows the pipeline for the Rotoscope. it is very similar to the first example however, in this case i set key frames to allow the area i had drawn to move inline with the building
This is the final video with the towers being a different colour. As you can see there is a red line outlining the green colour. This green line is the edge of the Rotoscope where i drew around the tower.
Advanced Rotoscope

The image above shows a simple Rotoscope which is good for a still image. However when you want a to Rotoscope.

The method for sequences that a much more complicated require small parts of the image to be rotoscoped separately. An example of this is shown above.

The sequence i rotoscoped was a man moving his thumb and fingers around. This meant i had to use the advanced method to rotoscope the sequence. The best part about drawing around the hand is it is already separated by the wrinkles on the hand. I draw around the first area of the phumb.

I draw around the thumb, however the manipulation points cant be to complicated. What i mean by that is i cant have to many point around it and only need them on the corners. If it is to complicated it can make the Rotoscope boil, which is a term used in the industry to describe a bad rotoscope.

I drew over the rest of the thumb, with each section overlapping

Next i rotoscoped the Index finger using the same method as the thumb. One thing i missed out whilst explaining the thumb is how i will select each part of the thumb and change the pivot point (which is the small ex in the box. This will help me rotate the thumb during each frame and keep the shape accurate each time i rotate it.

In this image i have rotated the image, once i have rotated the image i automatically set the keyframe meaning each time i play through the timeline the rotoscope will move with the footage.

In the setting group to the right of the screen. I organised all the layers so it wasn't messy.

The lines by the dots when pulled out create a feather. This creates a soft edge around the mask. This helps make the mask edge be lighter and not sharp.
Here is the final video showing the rotoscope in action.
Keying
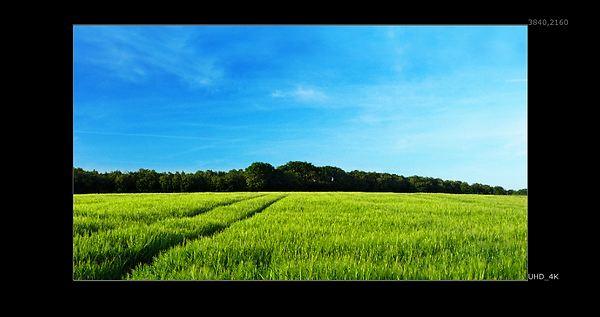
This is the original image that I needed to change the sky of.

In this image it shows the key that I want to merge into the first image.

In this image i am using the alpha to adjust the lighting of the image. The goal that i want to make the whole sky black. This will make is transparent and will let me put the new sky behind it. However the white that remained the sky i could not get rid of without distorting the rest of the image. The image is the best i could do before having to do further editing.

The node is used to change the lighting is the Luminescence node.

The premult node give the white area of the alpha a value of 1 and the black areas the value of 0

Using the Rotoscope node and drew around the remainder of the sky getting rid of it.

This is how the pipeline looks, Of the page is the rotoscope and illumination nodes. Connecting the sky with a merge node added it to the scene.

This is the final image.
Keying with a greenscreen

I began with a short clip of a women in front of a green screen slightly moving her head.

I added two Key light nodes one named as "Base key" the other named as "Garbage Keylight"

Once a keylight node is placed into the pipeline this settings tab comes up and on the Screen colour the little green box on the right i clicked on tht and selected the green this gets rid of the green background.

Once the first keylight was placed it could only get the background down by this much before i started losing detail in the hair.

The second key light was able to get the background down to this point.

I added in a filter erode node and expanded the alpha using this node

This is how the alpha looked once the erode had been added. I then added a merge node to connect the filter erode to the base keylight.

I then added the Roto node. With this node is drew around the women and cut out the back ground leaving just her in the image.

This is the rotoscope i made.

The first merge node i added i changed it property to a Mask and the second to a Stencil.

I than added a Premault node which changed the black areas of the alpha to the value of 0. I then connected all my work via another Merge node.

This is how my pipeline and the women looks after adding everything.
Advance Keying

This is the image that i started with.

I placed in a denoise node, in the bottom of the screen there is a square which i placed in a large area of noise.

I begun by placing a key light (Keylight 1)

I clicked on this square (The one that has the pen on it) I then selected top green area of her head

I pressed "CTRL" and dragged the mouse above her head.

I then brought in a Rotoscope node. I drew around the head. The Keylight setting is as above.

I then brought in Keylight2 and placed this one next to the subjects arm

I drew next to the arm, like the one above.

I put the settings like i did like above.

I then carried this process on 3 more times. Each time drawing the Rotoscope around different areas under the right arm under the left arm and the side of the right arm.

Once i had placed down all the rotoscopes I placed down another one and drew around the whole body and cut her out from the rest of the scene.

This is how the Pipeline looked at the end. The last Rotoscope at the bottom is the one i drew around the whole body. All the work goes through the copy node. Through the premalt. The Premalt node is the important one as it is the node that makes all the Zero value areas transparent.

This is the final image. The final pipeline is shown above.
Tracking

I began by bring in the video clip by pressing "R" and then clicking on the correct video. I also brought in a Tacking node.

This is the tracker editing area. I clicked on the add track button at the bottom. I also ticked all the three boxes to the right.


I placed the tracks onto two different areas of the scene. The first box is where the programme will search for data within this box.

This is how my pipeline looks. I brought in a Roto node and drew around the item on the roof top. (You can see this in the top left image)

I went to the transform tab and changed the transform to match move and set the reference fame to current frame.
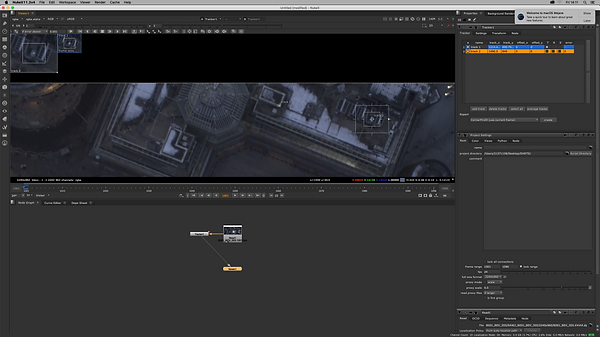
I clicked on the play button on the top tab. This then played through and tracked the scene.
This is the final video
Tracking glass

Using the Roto node i drew around the glass of the car.

I clicked on this icon at the top of the tab and clicked on the CornerPin2D (absolute, baked)

I clicked on the Corner pin Node and clicked on "Copy from"

I went to the from tab and clicked on Copy to

I then set the tabs to "No Animation"

The original Roto is no longer needed.

This is how the pipeline looked.

I then went through and key framed the Roto so it followed the car window as it does not follow the window completely accurately
Grading

This is the scene that i began with.

This is what i wanted to end with.

This is the image i began with.

I added in a Grade node and i called it Luma.
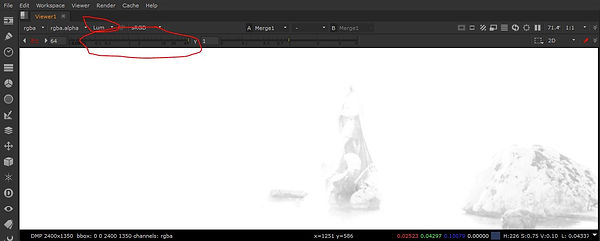
I changed the RGB to Luminescence by pressing Y. Which makes the scene go all bright. I then set the sliders on the Grade node as below.

These where what my sliders ended up like. The goal for this part was to get all the black areas of the statue match the black areas of the rock.

The next grade node i added into the scene, i named as Colour. The node was there to edit the colour of the object.

I went to the settings menu and i clicked on the colourful circle on the multiply to bring it up i pressed CTRL and left clicked.

Once i clicked on the colour pallet it brought up these settings. I then changed all sliders to these settings.

I then brought in a keyer Node

I looked within the alpha channel and changed the settings of Keyer to what it is on the right.

I then added a blur this kept all the detail. I then added a grade node and connected the mask.

I then changed the sliders to this, what this grade will do is highlight the areas at the front of the image. This is important as it helps brighten these areas to show sunlight on the image.

I then added in a Colour look up node This node allows me to edit a particular colour on a graph. The colour i need to edit is the dark areas of the image.

On the graph i selected the master i also placed my mouse over the colour i wanted to edit and the colours showed the area i wanted to edit. I changed the coordinators to 0.01 and 0.01 I then highlighted the bottom corner and pressed F to frame the image. I then highlighted the top right dot of the graph and pressed L, this then allowed me to edit the dark areas of the image.

This is the overall pipeline of this section.

This is what the statue looks like after the process.

This is the second pipeline i created. The process is the exact same as the previous one

This is the third process, again the exact same as the second one.

This is the final process and it completed it the exact same way as the previous ones.

This is my final image. There is still a little bit of work i need to complete on the tower on the right.
Static clean up

In this task I need to get rid of the old man in the scene, Then match the noise in the section that has been cut out.

I began by placing in a tracker node, due to the footage has a little bit of movement.

I placed the tracker on the steps and then tracked the footage.

Due to the fact that the footage does not twist or rotate i only needed to tick the T box.


I then added in a frame hold node, then in the settings I typed in our Hero frame which is 1100. The framehold node will hold the clip on the frame.
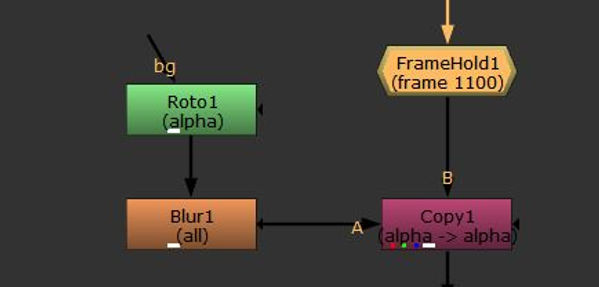
I added in a copy node and connected that to A Rotoscope node. I then drew the roto Node around the area which i wanted to cut out. I then added in a blur to cut out the sharp edges.

This is where i drew my roto.

I then added in a premault to cut out the Alpha of the roto.

I then placed the tracker under the premault and added a multiply node which i then connected the a merge that takes the pipeline back to the image.

This is how the final pipeline looks. I have also added a denoise node and a grain node to match the grain into the patch and the main image.

Tgis where i placed the denoise

I then brought in a grain node and I attached it to the denoise.

Within the grain settings i turned on the Invert through alpha.


I know want to use the wipe to adjust the denoise and match it.

These are the settings of the grain.
Clone tool

I began by bring in a Roto node.

I drew the Roto around the logo and then highlighted it. I then want to right click and create a planer track by making sure i am the first frame of the sequence and then click on Planer track forward
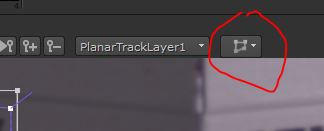
I clicked on this icon and selected the Cornerpin absalute baked.

I then brought in a frame hold and in the top right corner i set the frist frame to 1001.

I brought in a Rotopaint node and using the clone tool to draw over the MEXPOST.

I then brought in a copy node and attached a roto to it. I drew the roto over the the logo to create an al
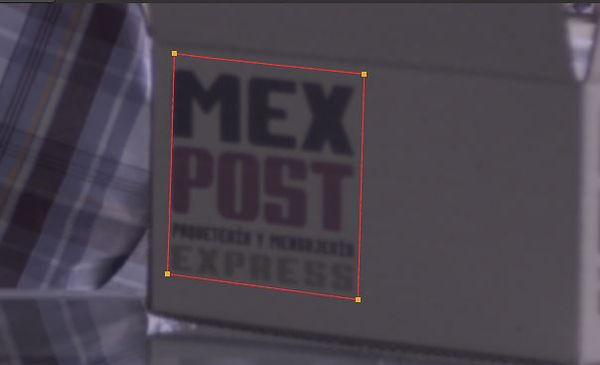

I drew the roto around the logo and ended up with the alpha.

I then placed in a premult node i then slotted the CornerPin and then placed in a the Merge node.

This is the complete pipeline for the first part of the task.

I now needed to apply the logo and attach it to the box. I started by placing in a Reformat node

This is the settings for the Reformat.

I added these nodes together so then it links to the image properly. I then moved the image to the correct area.

This is what it looked like when reshaped.

I added a grade node and named it "Luma" i changed the Multiply to do this. I then added in the Saturation Node to help adjust it into the scene.

I then Added a Defocus node to make the image blurry to help it fit into the scene.

This is how the piepline looked at the end. I added duplicated the original corner pin node and placed within the pipeline. This then attached to the merge node.
Greenscreen

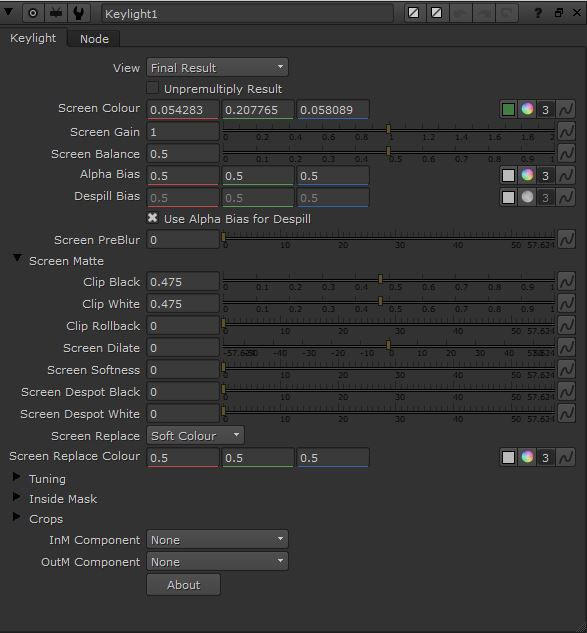
I brought in a Keylight Node and the settings are shown above.

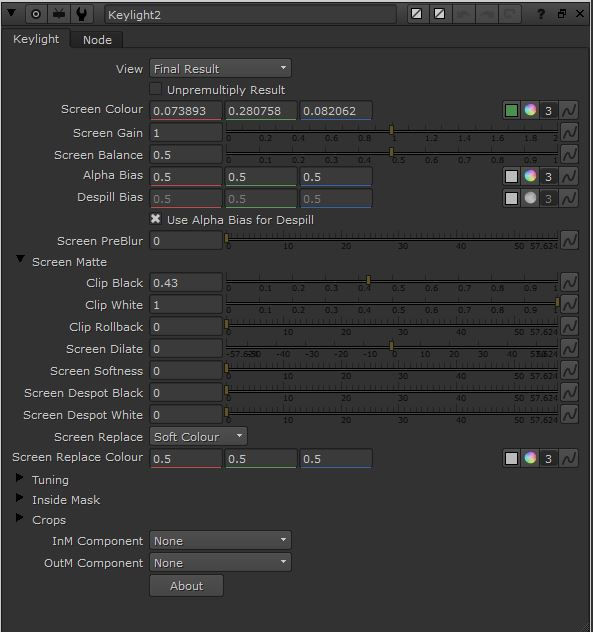
I brought in a second keylight node. I needed a second one to take out the green area above the head of the women.


I brought in a filter erode node. I did this to add in the information around the women's hair.

The effect of this can be viewed within the Alpha channel.
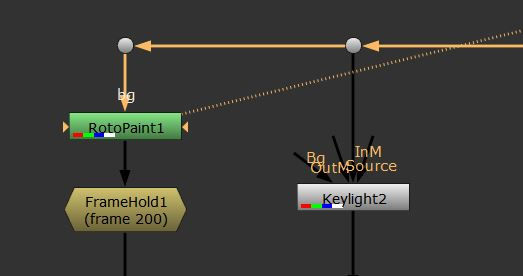

I added in a Frame hold and set this frame at 200 which is the start of the video. On top of the framehold i put in a Rotopaint.


Using the Rotopaint Node i used the stamp tool to cover up the tracker markers

I brought in a Roto node and connected it to a Copy node.

I used the roto to cut the women out of the of the scene and cut all the garbage from the video.

After the Copy node i brought in a Premault node and then the tracker node which i made earlier.

I then added in a merge node and changed it to a Mask which was then connected to the merge we added in earlier.

I then brought in a despil Madness which i copied. I then added in a premault which i then connected to a merge and then a constant node. Then finally i added in a write Render
Nuke Test
At the end of the first term of the second year of University i had to complete a test to show how much i had learned.
This is the example of what the my final edit should look like.

This is the first frame of the the sequence, i added this image in to allow you to see what i started with.


In these images i am creating a Corner pin node. To start i placed in a Roto node. This allowed me to draw around the IDS logo. Which i then left clicked and dragged to select the whole thing. I then right clicked and selected "Planer-Track this shape (FWD)" This then essentially recorded the movement of the logo exactly like a tracker node. The reason why i have not got images showing this is because when i was writing this out i only had accesses to the Non-commercial programme which did not allow This. I then went to the top of the tab just above the video/Image area and selected the CornerPin2D1. At this second i do not need this so will put it to the side for now.


I added in the FrameHold node. The frame that i held was 1020.

I added in a RototPaint node. I did this to Paint over the logo.


Using the stamp tool I i took the pixels from one bit of the image and placed it onto another. The top image is the beginning and the bottom is the end result.

This is what the current pipeline looks like. I added in a copy node which is connected to a roto, which i drew around the logo. This creates an alpha.

This is the Alpha i created. What it does is it placed the Roto paint over the image when i place in a merge.


I then added in grade nodes. I did this to change the colour of the patch as the lighting changes through the scene. The reason there are three is because i have the Luma node. Which is used to change the the brightness of the patch. The second two Grade nodes are there to cover a different areas like the image above.

This is the final pipeline for the Label remove section. I added in a premult node, under the Grade section. after that i added in the Corner pin node i mentioned earlier then i added a merge nod and connected it back up to the original clip.
Track markers removal
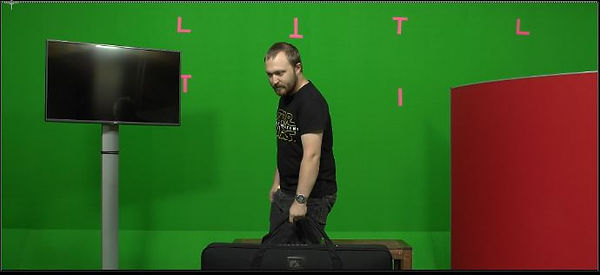


This next section is similar to the first section but it is alot easier. I started with a Rotopaint node and did exactly what i did with the first section and used the surrounding pixels to cover up the tracker markers.

The pipeline is again exactly the same as the first one apart from the Corner pine node.
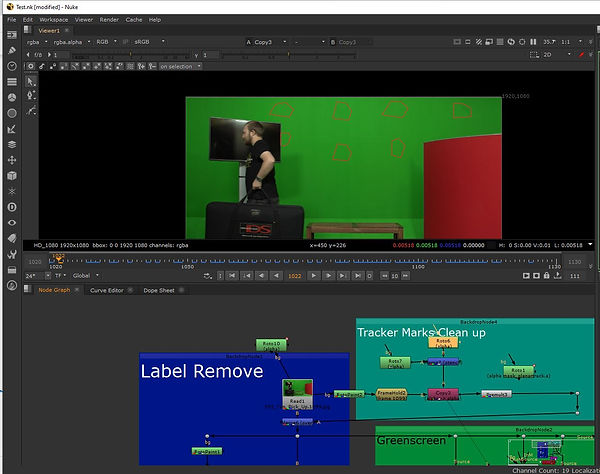
I placed in a roto to draw around each of the markers. is did this to add an alpha around them so the rotopaint is seen and cut out.

The second Roto in this section is drawn around the person. This roto is more complicated then any of the other ones in the scene as when a roto is placed around a person it needs to placed into little sections to create an accurate roto to help move with each of the persons different body parts.


The images above show the roto in different sections of the scene.

This is the complete pipeline for Tracker mark clean up.

These two sections i have worked on have been connected by this merge. The part of which i struggled with the most with this task was connecting all the different sections together.
Greenscreen section
In this section i got rid of the greenscreen. However, this was the worst part for me as i struggle to get the pefect balance.

I started by placing in a keylight node.

I then selected the little box on the right next to the colour wheel and selected an area of the greenscreen i wanted to sample.


Using the sliders shown in the second picture i was able to adjust the whiteness and the blackness of the alpha. The end goal is try and make it as black as you possibly can to get rid of all the greenscreen. But as you can see i have not been able to do this with just one green screen so i will have to add more.


The mage above shows the second Keylight i added in. With this Keylight i wanted to aim to focus on the area above the tv.


I then created a Keylight to focus on the area behind the tv. However with this keylight i added a roto to filter out the areas around the feet. otherwise it would mess up with the scene due to some of the areas that are meant to be white being black.


The 4th and final keylight is this one. I wanted to get rid generally most of the greenscreen. The reason i added in so many was because i had issues with areas around the tv.

This is the complete pipeline for the greenscreen section I said earlier that the third Keylight is connected to a roto. This is the area at the bottom.


The roto is connected to a filter erode which then is connected to a keymix that is connecting everything else together.
This is the roto that i placed around this feet. This is keyed to follow the character along the shot.
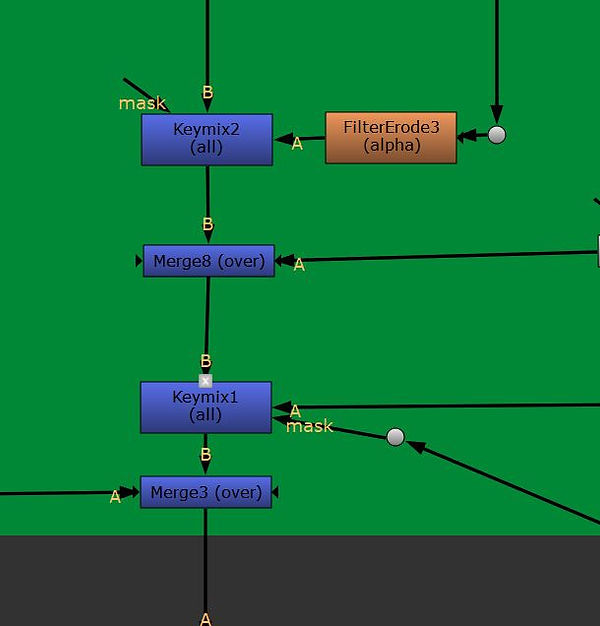
All of the keylights go through Keymix's and merge nodes.
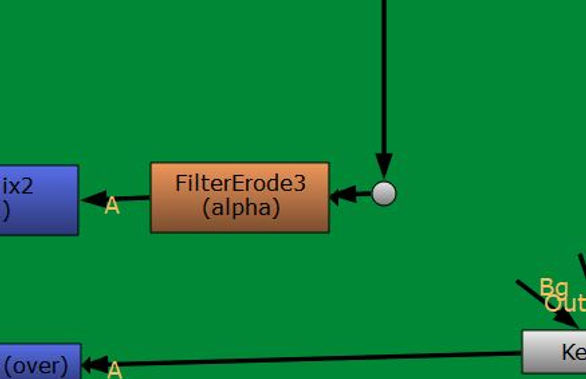


I placed a filter erode in to bring back some of the detail lost whilst using the keylight.

The Label remove section and the greens screen section are then both connected via a Copy node. This copy node then feeds the pipeline through to a despil madness which is used to get rid of any green reflected from the green screen onto the character. I then placed a constant node this is a node that can create a solid colour. In my case i have used it for the background, to replace the greenscreen.
TV screen and mask
In this final section i add in the image that will go over the tv screen and i add in


I added in the colour bars node, this is an image that has coloured bars on it. I also added in the reformat,Cornerpin and Transform nodes. These nodes allowed me to place the Image where i like and allowed me to manipulate it size.

I added in a grade node, this allowed me to change the colour of the picture make it fit in to the shot.

These are the sliders for the grade node.

The roto node that i added earlier where it follows the man is the same one as here.
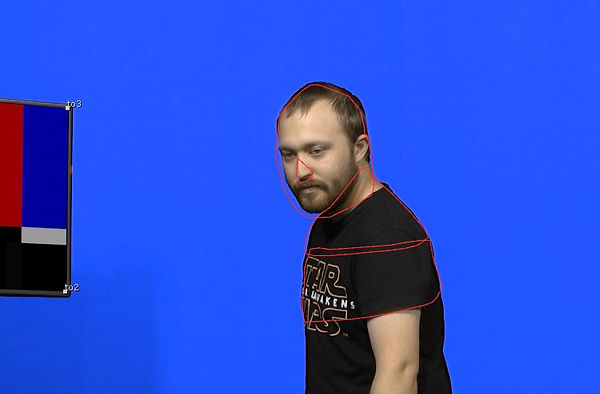
This is the roto. I had to change its position frame by frame so it looked good when it passed by the tv.

This is the settings for the write node. This node allows me to render out the sequence
This is the final footage of my work. It is recorded within Nuke as it would not let me upload any files rnedered from nuke.