Quick Rig

I began with a skeleton rig.
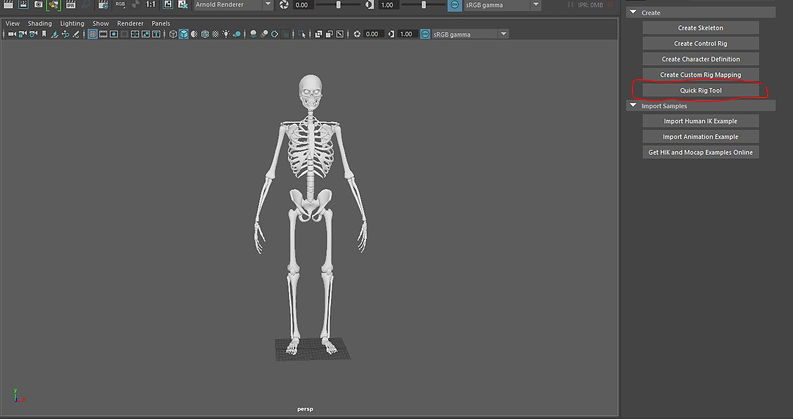
I clicked on quick rig tool.

I clicked on the plus symbol and once i did that i clicked on the step by step icon.

I clicked on the plus to add all the objects. I then changed the Embed Method to Polygon Soup. I then clicked on Create/Update.

I then changed the the points onto the joints. I did this by moving one side into the correct position which i then corrected the other side by clicking on the icon labelled as 2.
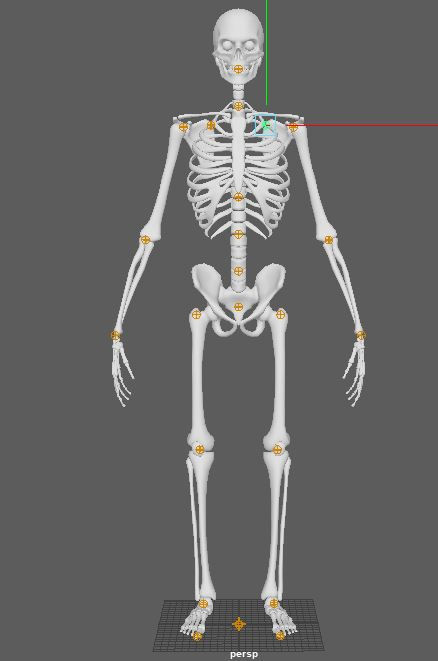
This is how the final points looked.

I then changed the option labelled as 1 to skeleton settings. I then hit create which then made a connected rig.
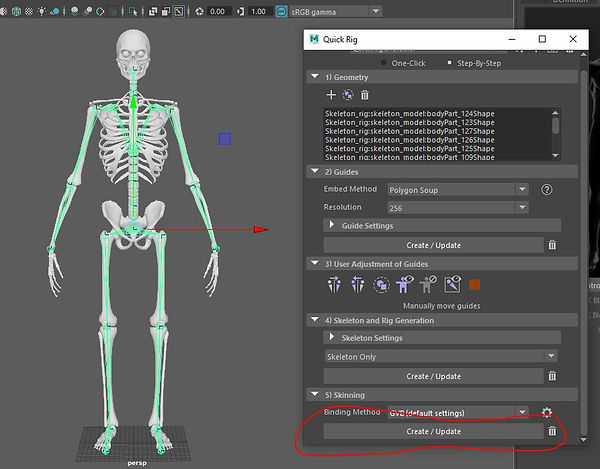
I then hit create in section 5

I then selected select > then Hierarchy.

I clicked on Rotate X,Y and Z and i pressed 0. to zero the Motion capture skeleton.

I re selected the motion capture skeleton and then changed the Rotate X to 90. This then rotated the Skeleton up with it arms out.

I changed the Character to None and selected Create Character Definition.

I then selected the arm of the rig and then selected the same area on the character on the right. I then right clicked and selected Assign selected bone.
In this video i assign all the bones to the right areas.

I then selected the character as the quick rig and the source as the motion capture rig.
Motion capture
Today I learned how to set up and add Motion capture to a character

When the Motion capture is added to the rig some of the bones move by bending and stretching which it is not meant to do.

To fix this I went to Skins - Paint skin weights. Then click on the box.

Once I clicked on the square this window opened. Here I want to select the bone that I want to fix and then select the right area. You know it is the right area as the bone selected while lighten up in colour.


Here you can see the colour of the bone lightens up.
Using scripts to create a T Pose

It is always important when importing Mocap to put it into a T-pose before adding character definition. We can do this in one of two ways. We can either do it by selecting the Hierarchy of the mocap and setting all the rotations to 0. Or we can use a script to set all the rotation to 0.

To apply the script i needed to open the script editor. I did this by going to Windows > General Editor > Script Editor. I then opened the script. This script was alread made for me. Below is the script:
select -r Hips ;
SelectHierarchy;
setAttr "LeftToeBaseEnd.rotateZ" 0;
setAttr "LeftToeBaseEnd.rotateX" 0;
setAttr "Hips.rotateX" 0;
setAttr "Spine.rotateX" 0;
setAttr "Spine1.rotateX" 0;
setAttr "Spine2.rotateX" 0;
setAttr "Spine3.rotateX" 0;
setAttr "Neck.rotateX" 0;
setAttr "Neck1.rotateX" 0;
setAttr "Head.rotateX" 0;
setAttr "HeadEnd.rotateX" 0;
setAttr "RightShoulder.rotateX" 0;
setAttr "RightArm.rotateX" 0;
setAttr "RightForeArm.rotateX" 0;
setAttr "RightHand.rotateX" 0;
setAttr "RightHandThumb.rotateX" 0;
setAttr "RightHandMiddle.rotateX" 0;
setAttr "LeftShoulder.rotateX" 0;
setAttr "LeftArm.rotateX" 0;
setAttr "LeftForeArm.rotateX" 0;
setAttr "LeftHand.rotateX" 0;
setAttr "LeftHandThumb.rotateX" 0;
setAttr "LeftHandMiddle.rotateX" 0;
setAttr "RightUpLeg.rotateX" 0;
setAttr "RightLeg.rotateX" 0;
setAttr "RightFoot.rotateX" 0;
setAttr "RightForeFoot.rotateX" 0;
setAttr "RightToeBase.rotateX" 0;
setAttr "RightToeBaseEnd.rotateX" 0;
setAttr "LeftUpLeg.rotateX" 0;
setAttr "LeftLeg.rotateX" 0;
setAttr "LeftFoot.rotateX" 0;
setAttr "LeftForeFoot.rotateX" 0;
setAttr "LeftToeBase.rotateX" 0;
setAttr "LeftToeBaseEnd.rotateY" 0;
setAttr "Hips.rotateY" 0;
setAttr "Spine.rotateY" 0;
setAttr "Spine1.rotateY" 0;
setAttr "Spine2.rotateY" 0;
setAttr "Spine3.rotateY" 0;
setAttr "Neck.rotateY" 0;
setAttr "Neck1.rotateY" 0;
setAttr "Head.rotateY" 0;
setAttr "HeadEnd.rotateY" 0;
setAttr "RightShoulder.rotateY" 0;
setAttr "RightArm.rotateY" 0;
setAttr "RightForeArm.rotateY" 0;
setAttr "RightHand.rotateY" 0;
setAttr "RightHandThumb.rotateY" 0;
setAttr "RightHandMiddle.rotateY" 0;
setAttr "LeftShoulder.rotateY" 0;
setAttr "LeftArm.rotateY" 0;
setAttr "LeftForeArm.rotateY" 0;
setAttr "LeftHand.rotateY" 0;
setAttr "LeftHandThumb.rotateY" 0;
setAttr "LeftHandMiddle.rotateY" 0;
setAttr "RightUpLeg.rotateY" 0;
setAttr "RightLeg.rotateY" 0;
setAttr "RightFoot.rotateY" 0;
setAttr "RightForeFoot.rotateY" 0;
setAttr "RightToeBase.rotateY" 0;
setAttr "RightToeBaseEnd.rotateY" 0;
setAttr "LeftUpLeg.rotateY" 0;
setAttr "LeftLeg.rotateY" 0;
setAttr "LeftFoot.rotateY" 0;
setAttr "LeftForeFoot.rotateY" 0;
setAttr "LeftToeBase.rotateY" 0;
setAttr "Hips.rotateZ" 0;
setAttr "Spine.rotateZ" 0;
setAttr "Spine1.rotateZ" 0;
setAttr "Spine2.rotateZ" 0;
setAttr "Spine3.rotateZ" 0;
setAttr "Neck.rotateZ" 0;
setAttr "Neck1.rotateZ" 0;
setAttr "Head.rotateZ" 0;
setAttr "HeadEnd.rotateZ" 0;
setAttr "RightShoulder.rotateZ" 0;
setAttr "RightArm.rotateZ" 0;
setAttr "RightForeArm.rotateZ" 0;
setAttr "RightHand.rotateZ" 0;
setAttr "RightHandThumb.rotateZ" 0;
setAttr "RightHandMiddle.rotateZ" 0;
setAttr "LeftShoulder.rotateZ" 0;
setAttr "LeftArm.rotateZ" 0;
setAttr "LeftForeArm.rotateZ" 0;
setAttr "LeftHand.rotateZ" 0;
setAttr "LeftHandThumb.rotateZ" 0;
setAttr "LeftHandMiddle.rotateZ" 0;
setAttr "RightUpLeg.rotateZ" 0;
setAttr "RightLeg.rotateZ" 0;
setAttr "RightFoot.rotateZ" 0;
setAttr "RightForeFoot.rotateZ" 0;
setAttr "RightToeBase.rotateZ" 0;
setAttr "RightToeBaseEnd.rotateZ" 0;
setAttr "LeftUpLeg.rotateZ" 0;
setAttr "LeftLeg.rotateZ" 0;
setAttr "LeftFoot.rotateZ" 0;
setAttr "LeftForeFoot.rotateZ" 0;
setAttr "LeftToeBase.rotateZ" 0;
select -r Hips ;
setAttr "Hips.rotateX" 90;
// New character 'Character1' was created.
select -r Hips ;
hikCreateDefinition;hikOnSwitchContextualTabs;
ls -selection -type "transform";
ls -selection -type "transform";
hikUpdateCharacterListCallback;
hikUpdateCharacterListCallback;
ls -selection -type "transform";
ls -selection -type "transform";
ls -selection -type "transform";
ls -selection -type "transform";
ls -selection -type "transform";
ls -selection -type "transform";
// New character 'Character1' was created.
setFilterScript "initialShadingGroup";
// Result: 0 //
setFilterScript "initialParticleSE";
// Result: 0 //
setFilterScript "defaultLightSet";
// Result: 1 //
setFilterScript "defaultObjectSet";
// Result: 1 //
dR_updateCommandPanel;
updateAnimLayerEditor("AnimLayerTab");
statusLineUpdateInputField;
if (!`exists polyNormalSizeMenuUpdate`) {eval "source buildDisplayMenu";} polyNormalSizeMenuUpdate;
dR_updateCounter;
$gHIKneedSyncOnSetKeyframe=1;
// Result: 1 //
hikControlRigSelectionChangedCallback;
autoUpdateAttrEd;
hikUpdateCharacterControlsUI(false);
hikResizeTabLayout;
ls -selection -type "transform";
// Result: Hips //
ls -selection -type "transform";
// Result: Hips //
select -r Hips ;
dR_updateCommandPanel;
updateAnimLayerEditor("AnimLayerTab");
statusLineUpdateInputField;
if (!`exists polyNormalSizeMenuUpdate`) {eval "source buildDisplayMenu";} polyNormalSizeMenuUpdate;
dR_updateCounter;
$gHIKneedSyncOnSetKeyframe=1;
// Result: 1 //
hikControlRigSelectionChangedCallback;
autoUpdateAttrEd;
ls -selection -type "transform";
// Result: Hips //
ls -selection -type "transform";
// Result: Hips //
setCharacterObject("Hips","Character1",1,0);
ls -selection -type "transform";
// Result: Hips //
ls -selection -type "transform";
// Result: Hips //
ls -selection -type "transform";
// Result: Hips //
ls -selection -type "transform";
// Result: Hips //
dR_updateCommandPanel;
updateAnimLayerEditor("AnimLayerTab");
statusLineUpdateInputField;
if (!`exists polyNormalSizeMenuUpdate`) {eval "source buildDisplayMenu";} polyNormalSizeMenuUpdate;
dR_updateCounter;
$gHIKneedSyncOnSetKeyframe=1;
// Result: 1 //
hikControlRigSelectionChangedCallback;
autoUpdateAttrEd;

This is what the script does to the Mocap character. I can now assign the joints.
Time editor

This is the time editor. This is a easy way to edit the Mocap. I opened it by going to Windows > Animation editor > Time editor. To add an animation to the time editor i dragged the mocap from the outliner and placed it in the time editor.

In the time editor it is easy to cut out parts of the animation. It is also easy to merge animation together.

I can then add a second Mocap to the time editor. This then allows me to merge both of these together and make a longer animation.
Using the Mocap system
I got the privilege to use and create my own Mocap due to the fact my University owns there own Mocap system.

In a group of four we used the Motion capture system. We turned the programme on. It is called the Vicon Shotgun. First we had to Calibrate it. We did this with the wand. We shaked it around in a figure of 8 motion so all the cameras could see it. Eventually we saw the wand on the monitor.

On the screen you can see each view of each camera the blue is the areas the wand has covered.
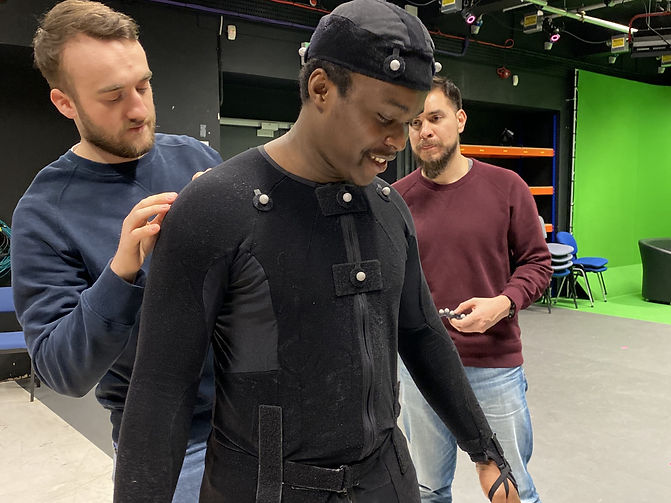
My job was to point the points onto the suit. There was 53 points of the suit.

There are 53 markers in total.

In this diagram it shows all the points on the body.
This is the final set up stage. You need to make these movements so the camera can see every point on the person.
Here are some of action we performed
These are some of the of the captures we got. They all cam out very well.
This is the one i chose to use and apply to my charactor.
Applying Mocap

This is the model i used to apply mocap to. It is a model i made for one of my previous assignments where i applied a rig to the model. I ended up taking away the swords as they where going through the other limbs once animated.

Within the human IK area i clicked on the Quick Rig Tool.

I clicked on Step-- to - step. I then clicked on the + symbol in the top right corner. This then creates a new work area. After this i selected the whole model, once i had selected everything i clicked on the plus symbol under Geometry.

The next step was to change the Embed method to Polygon Soup. I then clicked on Create/Update.

I had to use a previous image but the next stage was to Aline these points with all the joints. I did this by a lining the point and then pressing the icon in the left bottom corner of the User adjustment guide.
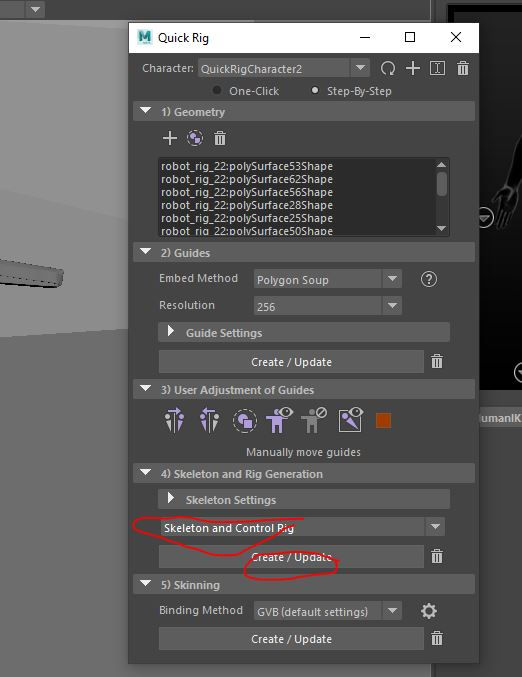
I then selected the Skeleton and control rig in the drop down option. I then clicked on create/Update. This then made a rig

I then parented all the appropriate joints to the correct joints of the rig. For example i parented the foot to the foot of the rig then the shin of the model to the shin of the rig. Then so on.

I then renamed this character to Robot.

Next it was time to bring in the Mocap I imported the file. Next part was to put the model into a T-Pose. I did this by selecting the Mocap and then go to the tab called Select > Hierarchy. In the top right corner in the channel box i highlihted the three rotation icons and set them to 0. this put the ocap into a T pose.
In this video i show how to apply mocap to definition.

Then in the Human IK section i set the character to the Robot. The source was then set to the Mocap. This means the Rig will be controlled by the Mocap.
This is the video showing my Rig working with the Mocap.
I then rendered the Video
Time Editor

I partially explained the time editor earlier on but now I am going into more detail with it. Like i explained earlier to open the time editor is went to Windows > Animation editors > Graph editor.

To add a animation to the time editor, in this case a Mocap slip, I clicked on the hips of the Mocap skeleton. I then went to Select > Hierarchy. Instead of being Green the slected skeleton should now turn white. In the Outliner i then clicked and dragged the hips joint into the Time editor. I did this with all the clips.


I added a second clip. This clip can be moved around within the timeline. It can be put on the same level as the first clip.

The clips if on the same level can be merged into each over by being dragged into the other one.
Camera
Basic cameras

Maya has four default cameras. These cameras are Top, Perspective, front and side. Each of these camera allow a different view. These cameras are not here for the final model or animation but they are here to assist in the building of models. The top, Front and Side camera are fixed to one spot. However, the perspective allows the user to completely move around the model.

Within Maya you can create your own cameras. This is done by selecting create, Cameras and then Camera. This will create a basic camera that can be placed wherever you want, similar to the perspective camera. The difference with this camera is its position can be key framed. Allowing it to be created in different types of shots such as pan and zoom.
Depth of field

Cameras within maya can have there settings changed and be manipulated just like cameras can be in real life. In this such case we are effecting the depth of field. This allows the camera to focus on a object that is closer to the camera then one that is far away. The first step to changing the depth of field is bringing up the Display details in the heads up display. selecting the object that is the closest to the camera (Or the one that we want to focus on) will bring up a number next to the Distance from camera. In this case it is 9.497.

Next we need to go to the settings of the camera within the attribute editor. under the depth of field tab i ticked the box, this allows me to edit the rest of the settings under the tab. The number we said about earlier needs to be put into the Focus distance box. The camera will now only focus on that object.
Other cameras
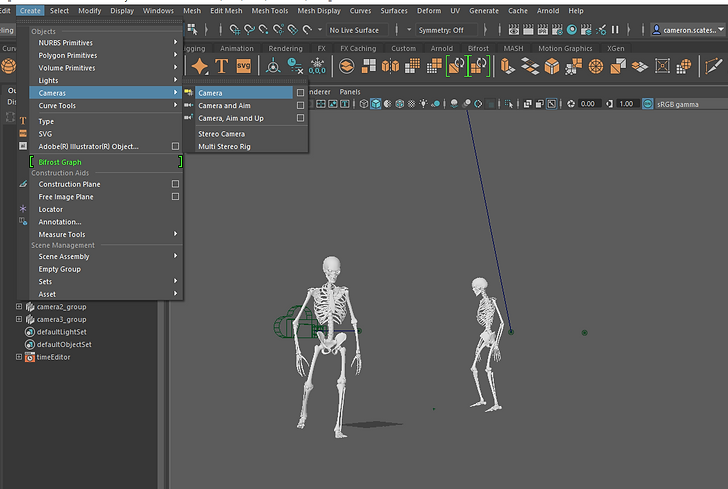
As well as the standard camera there is the Camera and aim, Camera, aim and up, Stereo camera and Multi stereo camera. The ones i will be talking about are the first two. The camera and aim comes with a aim node. This allows us to move it using the aim node. The Camera, Aim and up is the same except it comes with an extra node that allows you to move the camera up.
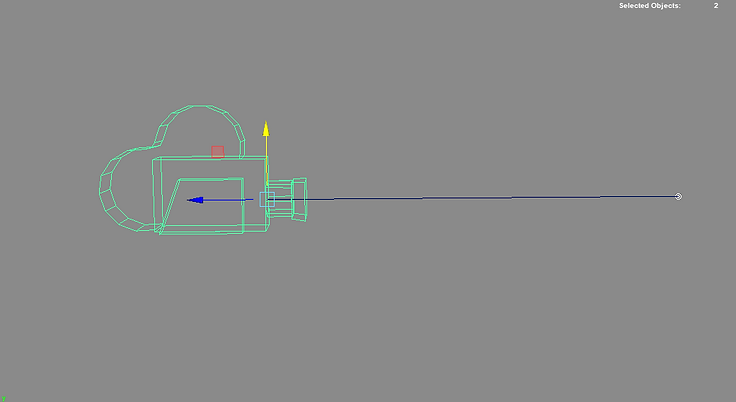
This is an aim camera. The node is the line coming of the camera with the little dot at the end. Once selected and moved the camera will follow.

This is a Camera, aim and up node. This can do everything the Aim camera can do but it can also be tilted side to side using the other node.
Assignment

I created a theatre scene that i would use as the environment for my scene The character will be performing a dance on the stage in front of an audience

The model that i am using for this is the same one i made earlier on during the previous assignment. To begin with i created a quick rig for my character. i explain this process within the previous assignment.
Time editor

To begin with it is important to select the Motion capture clip and import it into a new Maya scene. Next save the file as a Maya file rather then an OBJ file. This is important because an OBJ file always seems to have issues. Once the file is saved as a Maya file it can then be imported into the given scene.

I opened up the time editor to help edit all the different Motion capture clips. the path way to open up the Time editor is Windows > Animation editors > time editor. Next i selected the current Mo cap capture within the scene. Next within the time editor i clicked on File > Add animation from scene selection.

Once i imported the the first file into the time editor i now need to add in the second. This clip is the same as the first clip as it needs to be Maya file rather then an obj, this applies to every clip added to the scene. To add the clip i right clicked on the first track and then clicked on import the animation clip. If the file was imported correctly the slider when moved over the track the previous animation should disappear and the new one will take its place. The next step is to merge the animation into the previous one making the transmission smooth.

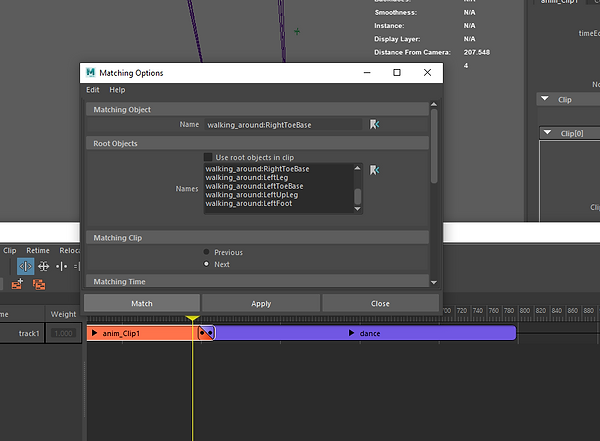
This is the step that can be very fiddly. I selected the first clip and then right clicked, i then clicked on Relocate > Match relocators. In the first option named matching object, in this section a part of the body that is in a similar position on both animations should be selected. The best position is the foot. Next No root object should be selected. Because we are matching the next clip with then select next. The next step is pressing Match. Then when the clip is added behind a clip that has already been matched the previous option needs to be selected. I find that most of the clips do not work straight away so the work flow is to jump back into the match relocators settings and turn of the root objects and click apply this tends to work.

This is the time editor within my clip. I merged 5 clips together. I did this with one model. This is because i tried to add two animations and i struggled to get the animations to work together. Therefor i have only added it to one model. The best part about the time editor is it is quick and easy to use. The clips can be easily cropped and duplicated.
These are all the clips mixed into one. The most important part for me is to make sure the transitions where good and are not easy to spot.
Camera

The next Camera i used within the shot is a Camera and aim. The aim icon which is the line sticking out the front. Helps move the camera around with ease. it helps you point the camera exactly where you want it. In this case i used it to follow the character as he dances around the scene.
I used the same camera later on to create a long shot pan shot that pans around the whole stage. The best part about the aim part of the camera is it allows me to place the aim on the object i want to focus on this case the robot and then move the camera. The camera will always be looking at the same spot.

These two cameras allow there to be different angles. I have a straight medium shot and another medium shot.
Camera Sequencer

The Camera sequencer is a very useful tool within Maya. It is essentially the same as using premier pro or after effects accept it is not as powerful. It allows you to place all of your shots within one sequence and export it out as one video. To open it we i went to Windows > animation editors > Camera sequencer.

Next i needed to create a shot. I did this by going to Create > Shot. it then brings up the options that are within the image. I named the shot Shot 1 then within the Shot Camera option i selected the camera i wished to add to the shot. In this case Camera1 is selected. I then set the start frame to 0 and the end frame to 83, this then creates the length of the shot.

Once i clicked on Match it then adds the shot to the timeline. Here i can move the shot around. the timeline and even change the length of the shot.

Then with each of the other shots it was the same process. except i change the name, the camera and the start/finish time. So i did this for the next 4 shots.

Each time i created a shot i lined them up and ran through the timeline making sure it worked properly. This image shows three shots that i added to the scene.
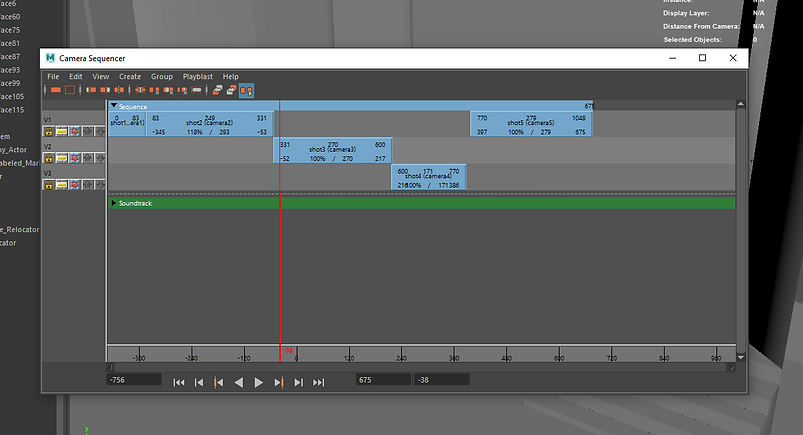
Finally after i added all the shots in the sequencer this is what i got. Now when i move the slider through the timeline the cameras will change.
Once i have added all the shots this is what i get when i play it through. This is what i now have. it plays through the sequence and changes the shots. I can then render this out and it will flow through as a scene.
Render setup

Using the render set up i am able to access all the tools i need to finalis a render in one place. I accessed it by going to windows > Rendering editors > Render setup.

There are three settings already within the editor. the first one is the render settings. By double clicking i can quickly access these settings. These settings allow me to up the quality of the render. However it does a dd to the render time.

I can access the AOV's

I can also access the all the lights within the scene.

To create a layer all that needs to be done i click on the Icon labelled as 1 within the image. Then once a layer is made we need to right click on the layer and then select create collection. This is a group that i can then place objects from my scene in. I can then app,y separate settings to the object that can then be rendered out. To apply the object to this collection i grabbed it from the outliner.

So i created multiple layers. each one of these layers can be rendered differently to the others.
Depth of field

First of all with depth of field it is good to understand what character or object you want the camera to focus on. Then look on at the distance from camera. this is the key stat.

AS you can see in the image. The seats next tot the camera are blurred out this is due to me putting the number that we talked about before into the Focus distance option.

I changed the setting to 200 on the focus distance. I did this to see what would happen. as we can see the stage area is beginning to lose focus.

Then when the camera zooms in the stage becomes more in focus. What i want to do is make the camera focus in on the stage as it comes in. to do this i changed the focus distance to 300 as when the camera is zoomed in this is the distance of the robot.
This is how the camera looks when depth of field of 300 is applied. I also applied depth of field to other cameras as well, following these same steps.
Lighting

I added 5 lights to the stage lights i made. I put these in to be bright lights to light up the stage. more then the rest of the scene.

Then i have the second lights that are there to simply light up the rest of the scene but to not overall the stage lights.
Final video
Here is my final play blast. I wanted to render the sequence but i ran out of time and could only apply a play blast. I will be honest i am not happy with this work. I had an idea for a linear story that i wanted to make using the motion capture shots. However, due to having to do the work all at home i had a lot of issues with my system which was really disappointing as i wanted to create pieces of work that i could use for a showreel. Al though i am not happy with my quality of work i have also decided the best of action was to show that i can use the tools that we have learnt and then during the holiday. As i will have plenty of time and practice i want to use all that i have learnt in this module to create a big project during my time of. I do believe i did show that i understand how the time editor works and created a good dance video.


